Setting up an IDE
These instructions apply to the Pulsar master branch, which uses a Gradle build. Apache Pulsar is using lombok, so you have to ensure your IDE setup with required plugins.
Pulsar does not officially support Windows. For developing Pulsar on Windows, using WSL2 (Windows Subsystem for Linux) is strongly recommended — use the most recent WSL2 version; legacy WSL (WSL 1) is not supported. IntelliJ IDEA supports developing in a WSL2 environment, and VS Code supports WSL2 via the WSL extension.
IntelliJ IDEA
Open the project
Open the Pulsar source directory in IntelliJ IDEA (File → Open and select the cloned pulsar directory). IntelliJ detects the Gradle build from settings.gradle.kts and imports the project automatically.
Configure the JDK
Building the master branch requires JDK 21 or 25 (see "Setting up JDKs using SDKMAN").
- Set the project JDK: Click File → Project Structure → Project Settings → Project and select a Java 21 JDK. From the JDK version drop-down list you can also choose Download JDK... and select version 21 and vendor Amazon Corretto.
- Set the Gradle JVM: Click Settings → Build, Execution, Deployment → Build Tools → Gradle and set Gradle JVM to Project SDK.
Build and run delegation to Gradle
Keep the default setting Build and run using: Gradle and Run tests using: Gradle (Settings → Build, Execution, Deployment → Build Tools → Gradle). With Gradle delegation, annotation processing (Lombok) and code generation (protobuf / lightproto) are handled by the Gradle build, so no separate annotation-processing configuration is needed.
Ensure the Lombok plugin is enabled in IntelliJ (it is bundled with recent IntelliJ IDEA versions).
Configure code style
- Open Code Style Settings dialog box by going to Settings → Editor → Code Style.
- Click on the ⚙ symbol → Import scheme → IntelliJ IDEA code style XML
- Pick the file
${pulsar_dir}/src/idea-code-style.xml - On the dialog box that opens, click OK.
- Ensure the scheme you just created is selected in Scheme dropdown then click OK.
Configure Checkstyle
- Install the Checkstyle-IDEA plugin.
- Open Checkstyle Settings. Click Settings → Tools → Checkstyle.
- Set Checkstyle version to the version used by the build (defined as
checkstyleingradle/libs.versions.toml), or the nearest version available in the plugin. - Set Scan scope to Only Java sources (including tests).
- Click + button in the Configuration section to open a dialog to choose the checkstyle config file.
- Enter a Description. For example, Pulsar.
- Select Use a local checkstyle file.
- Set File to buildtools/src/main/resources/pulsar/checkstyle.xml.
- Select Store relative to project location.
- Click Next
- For suppressions, set the absolute path of buildtools/src/main/resources/pulsar/suppressions.xml file. In the shell you can find it out with
echo $PWD/buildtools/src/main/resources/pulsar/suppressions.xmlcommand. - Click Next → Finish.
- Activate the configuration you just added by toggling the corresponding box.
- Click OK.
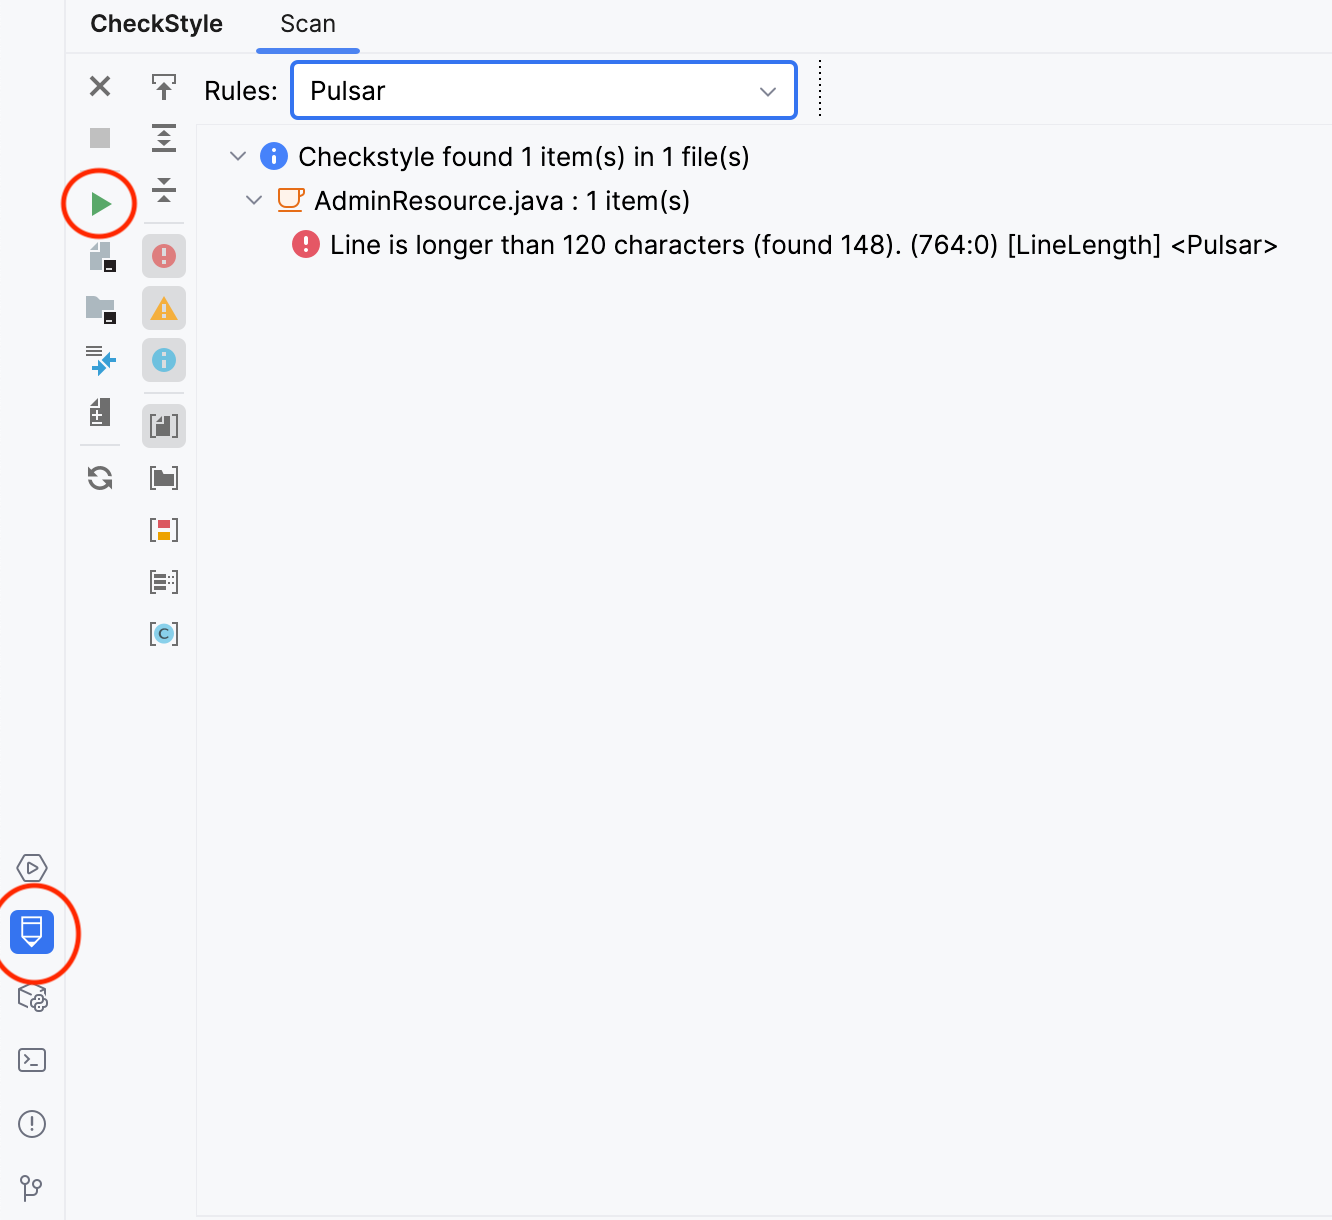
You can scan individual files by activating CheckStyle UI in the left side bar. The icon is a pencil.
Visual Studio Code (VS Code)
Before starting, make sure you have installed the Java Extension Pack in VS Code.
On Windows, use WSL2 with VS Code's WSL extension, which runs the development environment inside WSL2 while the VS Code UI runs on Windows.
It is recommended to use SDKMAN to manage Java versions. The separate guide how to setup build tools explains how to install Java 21 using SDKMAN.
Once you have installed the Java versions using SDKMAN, you can add (or modify) the following settings to your VS Code User level settings.json file. Please check VS Code documentation for more details. The simplest way to open the settings file is to run the Preferences: Open Settings (JSON) command from the Command Palette (Ctrl+Shift+P or Cmd+Shift+P on Mac).
{
    "java.jdt.ls.vmargs": "-Xmx6g -XX:+UseZGC -XX:+ZGenerational -Dsun.zip.disableMemoryMapping=true",
    "java.jdt.ls.java.home": "~/.sdkman/candidates/java/21",
    "java.configuration.runtimes": [
        {
            "name": "JavaSE-21",
            "path": "~/.sdkman/candidates/java/21",
            "default": true
        }
    ],
    "java.autobuild.enabled": false,
    "java.debug.settings.onBuildFailureProceed": true,
    "java.compile.nullAnalysis.mode": "disabled",
    "java.configuration.updateBuildConfiguration": "interactive"
}
The java.autobuild.enabled setting is set to false since building the Pulsar project in VS Code takes very long time.
The java.debug.settings.onBuildFailureProceed is set to true so that tests can be run even when there are individual build failures.
For troubleshooting, please check Language support for Java extension documentation. Adding "java.transport": "stdio" to the settings can help display errors in the error log if the problem is related to the language server.
Eclipse
Follow these instructions to configure your Eclipse setup.