Deploy a cluster on bare metal
- Single-cluster Pulsar installations should be sufficient for all but the most ambitious use cases. If you are interested in experimenting with Pulsar or using Pulsar in a startup or on a single team, it is simplest to opt for a single cluster. If you do need to run a multi-cluster Pulsar instance, see the guide here.
- If you want to use all builtin Pulsar IO connectors in your Pulsar deployment, you need to download
apache-pulsar-io-connectorspackage and installapache-pulsar-io-connectorsunderconnectorsdirectory in the pulsar directory on every broker node or on every function-worker node if you have run a separate cluster of function workers for Pulsar Functions. - If you want to use Tiered Storage feature in your Pulsar deployment, you need to download
apache-pulsar-offloaderspackage and installapache-pulsar-offloadersunderoffloadersdirectory in the pulsar directory on every broker node. For more details of how to configure this feature, you can refer to the Tiered storage cookbook.
Deploying a Pulsar cluster involves doing the following (in order):
- Deploy a ZooKeeper cluster (optional)
- Initialize cluster metadata
- Deploy a BookKeeper cluster
- Deploy one or more Pulsar brokers
Preparation
Requirements
Currently, Pulsar is available for 64-bit macOS, Linux, and Windows. To use Pulsar, you need to install 64-bit JRE/JDK 8 or later versions.
If you already have an existing ZooKeeper cluster and want to reuse it, you do not need to prepare the machines for running ZooKeeper.
To run Pulsar on bare metal, the following configuration is recommended:
- At least 6 Linux machines or VMs
- 3 for running ZooKeeper
- 3 for running a Pulsar broker, and a BookKeeper bookie
- A single DNS name covering all of the Pulsar broker hosts
If you do not have enough machines, or to try out Pulsar in cluster mode (and expand the cluster later), you can deploy a full Pulsar configuration on one node, where Zookeeper, the bookie and broker are run on the same machine.
If you do not have a DNS server, you can use the multi-host format in the service URL instead.
Each machine in your cluster needs to have Java 8 or a more recent version of Java installed.
The following is a diagram showing the basic setup:
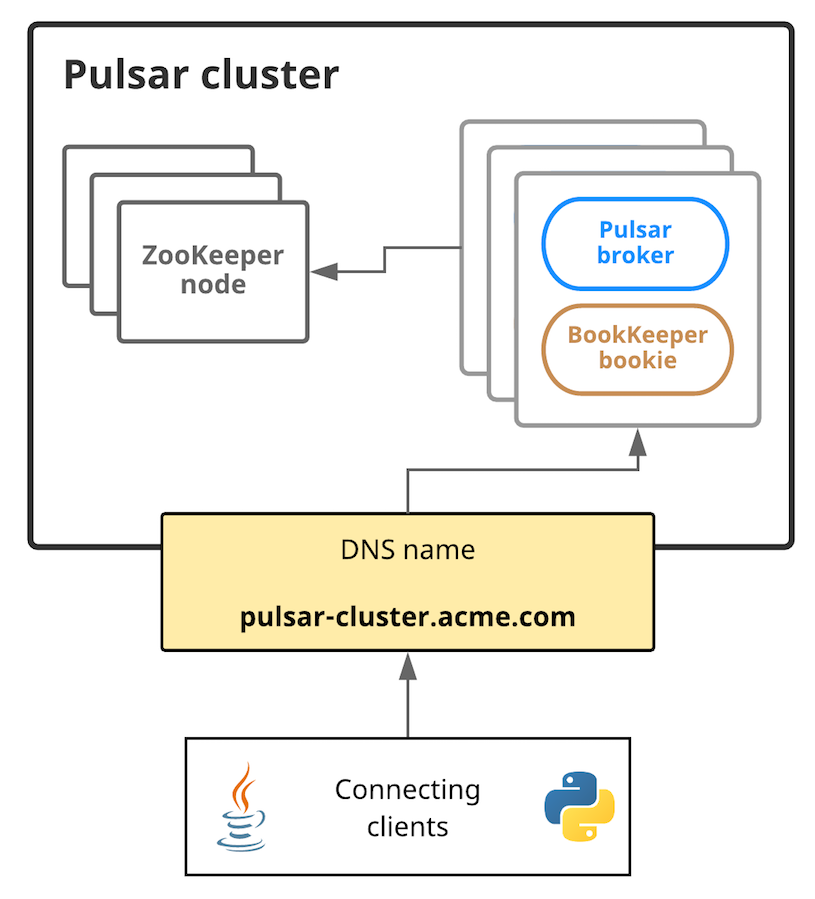
In this diagram, connecting clients need to be able to communicate with the Pulsar cluster using a single URL. In this case, pulsar-cluster.acme.com abstracts over all of the message-handling brokers. Pulsar message brokers run on machines alongside BookKeeper bookies; brokers and bookies, in turn, rely on ZooKeeper.
Hardware considerations
When you deploy a Pulsar cluster, keep in mind the following basic better choices when you do the capacity planning.
ZooKeeper
For machines running ZooKeeper, is is recommended to use less powerful machines or VMs. Pulsar uses ZooKeeper only for periodic coordination-related and configuration-related tasks, not for basic operations. If you run Pulsar on Amazon Web Services (AWS), for example, a t2.small instance might likely suffice.
Bookies and Brokers
For machines running a bookie and a Pulsar broker, more powerful machines are required. For an AWS deployment, for example, i3.4xlarge instances may be appropriate. On those machines you can use the following:
- Fast CPUs and 10Gbps NIC (for Pulsar brokers)
- Small and fast solid-state drives (SSDs) or hard disk drives (HDDs) with a RAID controller and a battery-backed write cache (for BookKeeper bookies)
Install the Pulsar binary package
You need to install the Pulsar binary package on each machine in the cluster, including machines running ZooKeeper and BookKeeper.
To get started deploying a Pulsar cluster on bare metal, you need to download a binary tarball release in one of the following ways:
- By clicking on the link below directly, which automatically triggers a download:
- From the Pulsar downloads page
- From the Pulsar releases page on GitHub
- Using wget:
$ wget https://archive.apache.org/dist/pulsar/pulsar-2.6.0/apache-pulsar-2.6.0-bin.tar.gz
Once you download the tarball, untar it and cd into the resulting directory:
$ tar xvzf apache-pulsar-2.6.0-bin.tar.gz
$ cd apache-pulsar-2.6.0
The extracted directory contains the following subdirectories:
| Directory | Contains |
|---|---|
bin | command-line tools](reference-cli-tools.md) of Pulsar, such as pulsar and [pulsar-admin |
conf | Configuration files for Pulsar, including for broker configuration, ZooKeeper configuration, and more |
data | The data storage directory that ZooKeeper and BookKeeper use |
lib | The JAR files that Pulsar uses |
logs | Logs that the installation creates |
Install Builtin Connectors (optional)
Since Pulsar release
2.1.0-incubating, Pulsar provides a separate binary distribution, containing all thebuiltinconnectors. If you want to enable thosebuiltinconnectors, you can follow the instructions as below; otherwise you can skip this section for now.
To get started using builtin connectors, you need to download the connectors tarball release on every broker node in one of the following ways:
-
by clicking the link below and downloading the release from an Apache mirror:
-
from the Pulsar downloads page
-
from the Pulsar releases page
-
using wget:
$ wget https://archive.apache.org/dist/pulsar/pulsar-2.6.0/connectors/{connector}-2.6.0.nar
Once you download the .nar file, copy the file to directory connectors in the pulsar directory.
For example, if you download the connector file pulsar-io-aerospike-2.6.0.nar:
$ mkdir connectors
$ mv pulsar-io-aerospike-2.6.0.nar connectors

$ ls connectors
pulsar-io-aerospike-2.6.0.nar
...
Install Tiered Storage Offloaders (optional)
Since Pulsar release
2.2.0, Pulsar releases a separate binary distribution, containing the tiered storage offloaders. If you want to enable tiered storage feature, you can follow the instructions as below; otherwise you can skip this section for now.
To get started using tiered storage offloaders, you need to download the offloaders tarball release on every broker node in one of the following ways:
-
by clicking the link below and downloading the release from an Apache mirror:
-
from the Pulsar downloads page
-
from the Pulsar releases page
-
using wget:
$ wget https://archive.apache.org/dist/pulsar/pulsar-2.6.0/apache-pulsar-offloaders-2.6.0-bin.tar.gz
Once you download the tarball, in the pulsar directory, untar the offloaders package and copy the offloaders as offloaders in the pulsar directory:
$ tar xvfz apache-pulsar-offloaders-2.6.0-bin.tar.gz

// you can find a directory named `apache-pulsar-offloaders-2.6.0` in the pulsar directory
// then copy the offloaders

$ mv apache-pulsar-offloaders-2.6.0/offloaders offloaders

$ ls offloaders
tiered-storage-jcloud-2.6.0.nar
For more details of how to configure tiered storage feature, you can refer to the Tiered storage cookbook
Deploy a ZooKeeper cluster
If you already have an existing zookeeper cluster and want to use it, you can skip this section.
ZooKeeper manages a variety of essential coordination- and configuration-related tasks for Pulsar. To deploy a Pulsar cluster, you need to deploy ZooKeeper first (before all other components). A 3-node ZooKeeper cluster is the recommended configuration. Pulsar does not make heavy use of ZooKeeper, so more lightweight machines or VMs should suffice for running ZooKeeper.
To begin, add all ZooKeeper servers to the configuration specified in conf/zookeeper.conf (in the Pulsar directory that you create above). The following is an example:
server.1=zk1.us-west.example.com:2888:3888
server.2=zk2.us-west.example.com:2888:3888
server.3=zk3.us-west.example.com:2888:3888
If you only have one machine on which to deploy Pulsar, you only need to add one server entry in the configuration file.
On each host, you need to specify the ID of the node in the myid file, which is in the data/zookeeper folder of each server by default (you can change the file location via the dataDir parameter).
See the Multi-server setup guide in the ZooKeeper documentation for detailed information on
myidand more.
For example, on a ZooKeeper server like zk1.us-west.example.com, you can set the myid value as follows:
$ mkdir -p data/zookeeper
$ echo 1 > data/zookeeper/myid
On zk2.us-west.example.com, the command is echo 2 > data/zookeeper/myid and so on.
Once you add each server to the zookeeper.conf configuration and have the appropriate myid entry, you can start ZooKeeper on all hosts (in the background, using nohup) with the pulsar-daemon CLI tool:
$ bin/pulsar-daemon start zookeeper
If you plan to deploy Zookeeper with the Bookie on the same node, you need to start zookeeper by using different stats port.
Start zookeeper with pulsar-daemon CLI tool like:
$ PULSAR_EXTRA_OPTS="-Dstats_server_port=8001" bin/pulsar-daemon start zookeeper
Initialize cluster metadata
Once you deploy ZooKeeper for your cluster, you need to write some metadata to ZooKeeper for each cluster in your instance. You only need to write this data once.
You can initialize this metadata using the initialize-cluster-metadata command of the pulsar CLI tool. This command can be run on any machine in your ZooKeeper cluster. The following is an example:
$ bin/pulsar initialize-cluster-metadata \
  --cluster pulsar-cluster-1 \
  --zookeeper zk1.us-west.example.com:2181 \
  --configuration-store zk1.us-west.example.com:2181 \
  --web-service-url http://pulsar.us-west.example.com:8080 \
  --web-service-url-tls https://pulsar.us-west.example.com:8443 \
  --broker-service-url pulsar://pulsar.us-west.example.com:6650 \
  --broker-service-url-tls pulsar+ssl://pulsar.us-west.example.com:6651
As you can see from the example above, you will need to specify the following:
| Flag | Description |
|---|---|
--cluster | A name for the cluster |
--zookeeper | A "local" ZooKeeper connection string for the cluster. This connection string only needs to include one machine in the ZooKeeper cluster. |
--configuration-store | The configuration store connection string for the entire instance. As with the --zookeeper flag, this connection string only needs to include one machine in the ZooKeeper cluster. |
--web-service-url | The web service URL for the cluster, plus a port. This URL should be a standard DNS name. The default port is 8080 (you had better not use a different port). |
--web-service-url-tls | If you use TLS, you also need to specify a TLS web service URL for the cluster. The default port is 8443 (you had better not use a different port). |
--broker-service-url | A broker service URL enabling interaction with the brokers in the cluster. This URL should not use the same DNS name as the web service URL but should use the pulsar scheme instead. The default port is 6650 (you had better not use a different port). |
--broker-service-url-tls | If you use TLS, you also need to specify a TLS web service URL for the cluster as well as a TLS broker service URL for the brokers in the cluster. The default port is 6651 (you had better not use a different port). |
If you do not have a DNS server, you can use multi-host format in the service URL with the following settings:
--web-service-url http://host1:8080,host2:8080,host3:8080 \
--web-service-url-tls https://host1:8443,host2:8443,host3:8443 \
--broker-service-url pulsar://host1:6650,host2:6650,host3:6650 \
--broker-service-url-tls pulsar+ssl://host1:6651,host2:6651,host3:6651
Deploy a BookKeeper cluster
BookKeeper handles all persistent data storage in Pulsar. You need to deploy a cluster of BookKeeper bookies to use Pulsar. You can choose to run a 3-bookie BookKeeper cluster.
You can configure BookKeeper bookies using the conf/bookkeeper.conf configuration file. The most important step in configuring bookies for our purposes here is ensuring that zkServers is set to the connection string for the ZooKeeper cluster. The following is an example:
zkServers=zk1.us-west.example.com:2181,zk2.us-west.example.com:2181,zk3.us-west.example.com:2181
Once you appropriately modify the zkServers parameter, you can make any other configuration changes that you require. You can find a full listing of the available BookKeeper configuration parameters here. However, consulting the BookKeeper documentation for a more in-depth guide might be a better choice.
Once you apply the desired configuration in conf/bookkeeper.conf, you can start up a bookie on each of your BookKeeper hosts. You can start up each bookie either in the background, using nohup, or in the foreground.
To start the bookie in the background, use the pulsar-daemon CLI tool:
$ bin/pulsar-daemon start bookie
To start the bookie in the foreground:
$ bin/bookkeeper bookie
You can verify that a bookie works properly by running the bookiesanity command on the BookKeeper shell:
$ bin/bookkeeper shell bookiesanity
This command creates an ephemeral BookKeeper ledger on the local bookie, writes a few entries, reads them back, and finally deletes the ledger.
After you start all the bookies, you can use simpletest command for BookKeeper shell on any bookie node, to verify all the bookies in the cluster are up running.
$ bin/bookkeeper shell simpletest --ensemble <num-bookies> --writeQuorum <num-bookies> --ackQuorum <num-bookies> --numEntries <num-entries>
This command creates a num-bookies sized ledger on the cluster, writes a few entries, and finally deletes the ledger.
Deploy Pulsar brokers
Pulsar brokers are the last thing you need to deploy in your Pulsar cluster. Brokers handle Pulsar messages and provide the administrative interface of Pulsar. A good choice is to run 3 brokers, one for each machine that already runs a BookKeeper bookie.
Configure Brokers
The most important element of broker configuration is ensuring that each broker is aware of the ZooKeeper cluster that you have deployed. Ensure that the zookeeperServers and configurationStoreServers parameters are correct. In this case, since you only have 1 cluster and no configuration store setup, the configurationStoreServers point to the same zookeeperServers.
zookeeperServers=zk1.us-west.example.com:2181,zk2.us-west.example.com:2181,zk3.us-west.example.com:2181
configurationStoreServers=zk1.us-west.example.com:2181,zk2.us-west.example.com:2181,zk3.us-west.example.com:2181
You also need to specify the cluster name (matching the name that you provided when you initialize the metadata of the cluster):
clusterName=pulsar-cluster-1
In addition, you need to match the broker and web service ports provided when you initialize the metadata of the cluster (especially when you use a different port than the default):
brokerServicePort=6650
brokerServicePortTls=6651
webServicePort=8080
webServicePortTls=8443
If you deploy Pulsar in a one-node cluster, you should update the replication settings in
conf/broker.confto1.
# Number of bookies to use when creating a ledger
managedLedgerDefaultEnsembleSize=1

# Number of copies to store for each message
managedLedgerDefaultWriteQuorum=1

# Number of guaranteed copies (acks to wait before write is complete)
managedLedgerDefaultAckQuorum=1
Enable Pulsar Functions (optional)
If you want to enable Pulsar Functions, you can follow the instructions as below:
-
Edit
conf/broker.confto enable functions worker, by settingfunctionsWorkerEnabledtotrue.
functionsWorkerEnabled=true -
Edit
conf/functions_worker.ymland setpulsarFunctionsClusterto the cluster name that you provide when you initialize the metadata of the cluster.
pulsarFunctionsCluster: pulsar-cluster-1
If you want to learn more options about deploying the functions worker, check out Deploy and manage functions worker.
Start Brokers
You can then provide any other configuration changes that you want in the conf/broker.conf file. Once you decide on a configuration, you can start up the brokers for your Pulsar cluster. Like ZooKeeper and BookKeeper, you can start brokers either in the foreground or in the background, using nohup.
You can start a broker in the foreground using the pulsar broker command:
$ bin/pulsar broker
You can start a broker in the background using the pulsar-daemon CLI tool:
$ bin/pulsar-daemon start broker
Once you successfully start up all the brokers that you intend to use, your Pulsar cluster should be ready to go!
Connect to the running cluster
Once your Pulsar cluster is up and running, you should be able to connect with it using Pulsar clients. One such client is the pulsar-client tool, which is included with the Pulsar binary package. The pulsar-client tool can publish messages to and consume messages from Pulsar topics and thus provide a simple way to make sure that your cluster runs properly.
To use the pulsar-client tool, first modify the client configuration file in conf/client.conf in your binary package. You need to change the values for webServiceUrl and brokerServiceUrl, substituting localhost (which is the default), with the DNS name that you assign to your broker/bookie hosts. The following is an example:
webServiceUrl=http://us-west.example.com:8080
brokerServiceurl=pulsar://us-west.example.com:6650
If you do not have a DNS server, you can specify multi-host in service URL as follows:
webServiceUrl=http://host1:8080,host2:8080,host3:8080
brokerServiceurl=pulsar://host1:6650,host2:6650,host3:6650
Once that is complete, you can publish a message to the Pulsar topic:
$ bin/pulsar-client produce \
  persistent://public/default/test \
  -n 1 \
  -m "Hello Pulsar"
You may need to use a different cluster name in the topic if you specify a cluster name other than
pulsar-cluster-1.
This command publishes a single message to the Pulsar topic. In addition, you can subscribe to the Pulsar topic in a different terminal before publishing messages as below:
$ bin/pulsar-client consume \
  persistent://public/default/test \
  -n 100 \
  -s "consumer-test" \
  -t "Exclusive"
Once you successfully publish the above message to the topic, you should see it in the standard output:
----- got message -----
Hello Pulsar
Run Functions
If you have enabled Pulsar Functions, you can try out the Pulsar Functions now.
Create an ExclamationFunction exclamation.
bin/pulsar-admin functions create \
  --jar examples/api-examples.jar \
  --classname org.apache.pulsar.functions.api.examples.ExclamationFunction \
  --inputs persistent://public/default/exclamation-input \
  --output persistent://public/default/exclamation-output \
  --tenant public \
  --namespace default \
  --name exclamation
Check whether the function runs as expected by triggering the function.
bin/pulsar-admin functions trigger --name exclamation --trigger-value "hello world"
You should see the following output:
hello world!