Deploy a cluster on bare metal
- You can use single-cluster Pulsar installation in most use cases, such as experimenting with Pulsar or using Pulsar in a startup or in a single team. If you need to run a multi-cluster Pulsar instance, see the guide.
- If you want to use all built-in Pulsar IO connectors, you need to download
apache-pulsar-io-connectorspackage and installapache-pulsar-io-connectorsunderconnectorsdirectory in the pulsar directory on every broker node or on every function-worker node if you have run a separate cluster of function workers for Pulsar Functions. - If you want to use Tiered Storage feature in your Pulsar deployment, you need to download
apache-pulsar-offloaderspackage and installapache-pulsar-offloadersunderoffloadersdirectory in the Pulsar directory on every broker node. For more details of how to configure this feature, you can refer to the Tiered storage cookbook.
Deploying a Pulsar cluster on bare metal consists of the following steps.
Preparation
Requirements
Currently, Pulsar is available for 64-bit macOS and Linux. See Run Pulsar In Docker if you want to run Pulsar on Windows.
Also, you need the proper 64-bit JRE/JDK version installed. Please refer to Pulsar Runtime Java Version Recommendation.
You can reuse existing Zookeeper clusters.
To run Pulsar on bare metal, the following configuration is recommended:
- At least 6 Linux machines or VMs
- 3 for running ZooKeeper
- 3 for running a Pulsar broker, and a BookKeeper bookie
- A single DNS name covering all of the Pulsar broker hosts (optional)
- Broker is only supported on 64-bit JVM.
- If you do not have enough machines, or you want to test Pulsar in cluster mode (and expand the cluster later), You can fully deploy Pulsar on a node on which ZooKeeper, bookie and broker run.
- If you do not have a DNS server, you can use the multi-host format in the service URL instead.
- Each machine in your cluster needs to have the recommended Java version installed (e.g. Java 17). Please refer to Pulsar Runtime Java Version Recommendation according to your target Pulsar version.
The following is a diagram showing the basic setup:
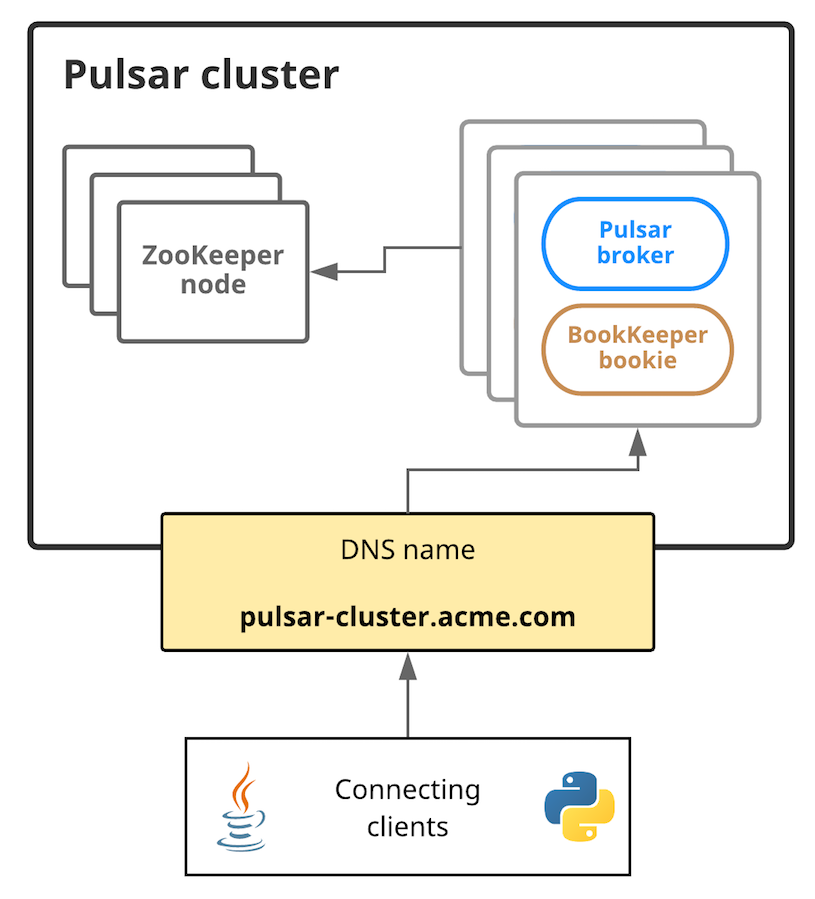
In this diagram, connecting clients need to communicate with the Pulsar cluster using a single URL. In this case, pulsar-cluster.acme.com abstracts over all of the message-handling brokers. Pulsar message brokers run on machines alongside BookKeeper bookies; brokers and bookies, in turn, rely on ZooKeeper.
Hardware considerations
If you deploy a Pulsar cluster, keep in mind the following basic better choices when you do the capacity planning.
ZooKeeper
For machines running ZooKeeper, it is recommended to use less powerful machines or VMs. Pulsar uses ZooKeeper only for periodic coordination-related and configuration-related tasks, not for basic operations. If you run Pulsar on Amazon Web Services (AWS), for example, a t2.small instance might likely suffice.
Bookies and Brokers
For machines running a bookie and a Pulsar broker, more powerful machines are required. For an AWS deployment, for example, i3.4xlarge instances may be appropriate. On those machines you can use the following:
- Fast CPUs and 10Gbps NIC (for Pulsar brokers)
- Small and fast solid-state drives (SSDs) or hard disk drives (HDDs) with a RAID controller and a battery-backed write cache (for BookKeeper bookies)
Hardware recommendations
To start a Pulsar instance, below are the minimum and the recommended hardware settings.
A cluster consists of 3 broker nodes, 3 bookie nodes, and 3 ZooKeeper nodes. The following recommendation is suitable for one node.
-
The minimum hardware settings (250 Pulsar topics)
Component CPU Memory Storage Throughput Rate Broker 0.2 256 MB / Write throughput: 3 MB/s
Read throughput: 6 MB/sWrite rate: 350 entries/s
Read rate: 650 entries/sBookie 0.2 256 MB Journal: 8 GB
PD-SSDLedger: 16 GB, PD-STANDARDWrite throughput: 2 MB/s
Read throughput: 2 MB/sWrite rate: 200 entries/s
Read rate: 200 entries/sZooKeeper 0.05 256 MB Log: 8 GB, PD-SSD
Data: 2 GB, PD-STANDARD/ / -
The recommended hardware settings (1000 Pulsar topics)
Component CPU Memory Storage Throughput Rate Broker 8 8 GB / Write throughput: 100 MB/s
Read throughput: 200 MB/sWrite rate: 10,000 entries/s
Read rate: 20,000 entries/sBookie 4 8GB Journal: 256 GB
PD-SSDLedger: 2 TB, PD-STANDARDWrite throughput: 75 MB/s
Read throughput: 75 MB/sWrite rate: 7,500 entries/s
Read rate: 7,500 entries/sZooKeeper 1 2 GB Log: 64 GB, PD-SSD
Data: 256 GB, PD-STANDARD/ /
Install the Pulsar binary package
You need to install the Pulsar binary package on each machine in the cluster, including machines running ZooKeeper and BookKeeper.
To get started deploying a Pulsar cluster on bare metal, you need to download a binary tarball release in one of the following ways:
- By clicking on the link below directly, which automatically triggers a download:
- From the Pulsar downloads page
- From the Pulsar releases page on GitHub
- Using wget:
wget https://archive.apache.org/dist/pulsar/pulsar-4.2.1/apache-pulsar-4.2.1-bin.tar.gz
Once you download the tarball, untar it and cd into the resulting directory:
tar xvzf apache-pulsar-4.2.1-bin.tar.gz
cd apache-pulsar-4.2.1
The extracted directory contains the following subdirectories:
| Directory | Contains |
|---|---|
bin | command-line tools of Pulsar, such as pulsar and pulsar-admin |
conf | Configuration files for Pulsar, including for broker configuration, ZooKeeper configuration, and more |
data | The data storage directory that ZooKeeper and BookKeeper use |
lib | The JAR files that Pulsar uses |
logs | Logs that the installation creates |
The conf directory contains configuration files for various Pulsar components. Below is a brief overview of the main configuration categories:
- JVM Configuration (
pulsar_env.sh/bkenv.sh): Controls JVM memory allocation (PULSAR_MEM,BOOKIE_MEM), garbage collection options (PULSAR_GC,BOOKIE_GC), and extra JVM options (PULSAR_EXTRA_OPTS,BOOKIE_EXTRA_OPTS) for Broker, BookKeeper, and other components. - Broker Configuration (
broker.conf): Core runtime parameters for the Pulsar Broker, including metadata store connection, cluster name, ports, message retention policies, authentication, and authorization settings. - BookKeeper Configuration (
bookkeeper.conf): Storage engine parameters for BookKeeper Bookies, including journal and ledger directories, ZooKeeper connection, compaction, and disk usage thresholds. - Log4j Configuration (
log4j2.yaml): Logging framework settings including log levels, output format, file rolling strategies, and log output directories. - Dynamic Configuration: Some Broker configuration properties can be updated at runtime without restarting the service, using the
pulsar-adminCLI tool or the Admin REST API. Dynamic configurations are stored in the metadata store (ZooKeeper) and take effect across all Brokers in the cluster.
For a complete list of all available configuration properties, see the Pulsar Configuration Reference.
Install Built-in Connectors (optional)
To use built-in connectors, you need to download the connectors tarball release on every broker node in one of the following ways :
-
by clicking the link below and downloading the release from an Apache mirror:
-
from the Pulsar downloads page
-
from the Pulsar releases page
-
using wget:
wget https://archive.apache.org/dist/pulsar/pulsar-4.2.1/connectors/{connector}-4.2.1.nar
Once you download the .nar file, copy the file to directory connectors in the pulsar directory.
For example, if you download the connector file pulsar-io-aerospike-4.2.1.nar:
mkdir connectors
mv pulsar-io-aerospike-4.2.1.nar connectors

ls connectors
pulsar-io-aerospike-4.2.1.nar
...
Install Tiered Storage Offloaders (optional)
To use tiered storage offloaders, you need to download the offloaders tarball release on every broker node in one of the following ways:
-
by clicking the link below and downloading the release from an Apache mirror:
-
from the Pulsar downloads page
-
from the Pulsar releases page
-
using wget:
wget https://archive.apache.org/dist/pulsar/pulsar-4.2.1/apache-pulsar-offloaders-4.2.1-bin.tar.gz
Once you download the tarball, in the Pulsar directory, untar the offloaders package and copy the offloaders as offloaders in the Pulsar directory:
tar xvfz apache-pulsar-offloaders-4.2.1-bin.tar.gz

# you can find a directory named `apache-pulsar-offloaders-4.2.1` in the pulsar directory
# then copy the offloaders

mv apache-pulsar-offloaders-4.2.1/offloaders offloaders

ls offloaders
tiered-storage-jcloud-4.2.1.nar
For more details of how to configure tiered storage feature, you can refer to the Tiered storage cookbook
Step 1: Deploy a ZooKeeper cluster
If you already have an existing zookeeper cluster and want to use it, you can skip this section.
ZooKeeper manages a variety of essential coordination-related and configuration-related tasks for Pulsar. To deploy a Pulsar cluster, you need to deploy ZooKeeper first. A 3-node ZooKeeper cluster is the recommended configuration. Pulsar does not make heavy use of ZooKeeper, so the lightweight machines or VMs should suffice for running ZooKeeper.
To begin, add all ZooKeeper servers to the configuration specified in conf/zookeeper.conf (in the Pulsar directory that you create above). The following is an example:
server.1=zk1.us-west.example.com:2888:3888
server.2=zk2.us-west.example.com:2888:3888
server.3=zk3.us-west.example.com:2888:3888
If you only have one machine on which to deploy Pulsar, you only need to add one server entry in the configuration file.
If your machines are behind NAT use 0.0.0.0 as server entry for the local address. If the node use external IP in configuration for itself, behind NAT, zookeper service won't start because it tries to put a listener on an external ip that the linux box doesn't own. Using 0.0.0.0 start a listener on ALL ip, so that NAT network traffic can reach it.
Example of configuration on server.3
server.1=zk1.us-west.example.com:2888:3888
server.2=zk2.us-west.example.com:2888:3888
server.3=0.0.0.0:2888:3888
On each host, you need to specify the ID of the node in the myid file, which is in the data/zookeeper folder of each server by default (you can change the file location via the dataDir parameter).
See the Multi-server setup guide in the ZooKeeper documentation for detailed information on
myidand more.
For example, on a ZooKeeper server like zk1.us-west.example.com, you can set the myid value as follows:
mkdir -p data/zookeeper
echo 1 > data/zookeeper/myid
On zk2.us-west.example.com, the command is echo 2 > data/zookeeper/myid and so on.
Once you add each server to the zookeeper.conf configuration and have the appropriate myid entry, you can start ZooKeeper on all hosts (in the background, using nohup) with the pulsar-daemon CLI tool:
bin/pulsar-daemon start zookeeper
If you plan to deploy Zookeeper with the Bookie on the same node, you need to start zookeeper by using different stats port by configuring the
metricsProvider.httpPortin zookeeper.conf.
Step 2: Initialize cluster metadata
When provisioning a new cluster, you need to initialize the cluster metadata on the metadata store (e.g., ZooKeeper). You need to initialize it only once.
You can initialize this metadata using the initialize-cluster-metadata command of the pulsar CLI tool. This command can be run on any machine in your Pulsar cluster, so the metadata can be initialized from a ZooKeeper, broker, or bookie machine. The following is an example:
bin/pulsar initialize-cluster-metadata \
    --cluster pulsar-cluster-1 \
    --metadata-store zk:zk1.us-west.example.com:2181,zk2.us-west.example.com:2181 \
    --configuration-metadata-store zk:zk1.us-west.example.com:2181,zk2.us-west.example.com:2181 \
    --web-service-url http://pulsar.us-west.example.com:8080 \
    --web-service-url-tls https://pulsar.us-west.example.com:8443 \
    --broker-service-url pulsar://pulsar.us-west.example.com:6650 \
    --broker-service-url-tls pulsar+ssl://pulsar.us-west.example.com:6651
As you can see from the example above, you will need to specify the following configurations. Items with * are required flags.
| Flag | Description |
|---|---|
--cluster* | A name for the cluster |
--metadata-store* | A "local" metadata store connection string for the cluster. This connection string only needs to include one machine in the ZooKeeper cluster. |
--configuration-metadata-store* | The configuration metadata store connection string for the entire instance. As with the --metadata-store flag, this connection string only needs to include one machine in the ZooKeeper cluster. |
--web-service-url* | The web service URL for the cluster, plus a port. This URL should be a standard DNS name. The default port is 8080 (you had better not use a different port). |
--web-service-url-tls | If you use TLS, you also need to specify a TLS web service URL for the cluster. The default port is 8443 (you had better not use a different port). |
--broker-service-url* | A broker service URL enabling interaction with the brokers in the cluster. This URL should not use the same DNS name as the web service URL but should use the pulsar scheme instead. The default port is 6650 (you had better not use a different port). |
--broker-service-url-tls | If you use TLS, you also need to specify a TLS web service URL for the cluster as well as a TLS broker service URL for the brokers in the cluster. The default port is 6651 (you had better not use a different port). |
If you do not have a DNS server, you can use multi-host format in the service URL with the following settings:
--web-service-url http://host1:8080,host2:8080,host3:8080 \
--web-service-url-tls https://host1:8443,host2:8443,host3:8443 \
--broker-service-url pulsar://host1:6650,host2:6650,host3:6650 \
--broker-service-url-tls pulsar+ssl://host1:6651,host2:6651,host3:6651
If you want to use an existing BookKeeper cluster, you can add the --existing-bk-metadata-service-uri flag as follows:
--existing-bk-metadata-service-uri "zk+null://zk1:2181;zk2:2181/ledgers" \
--web-service-url http://host1:8080,host2:8080,host3:8080 \
--web-service-url-tls https://host1:8443,host2:8443,host3:8443 \
--broker-service-url pulsar://host1:6650,host2:6650,host3:6650 \
--broker-service-url-tls pulsar+ssl://host1:6651,host2:6651,host3:6651
You can obtain the metadata service URI of the existing BookKeeper cluster by using the bin/bookkeeper shell whatisinstanceid command. You must enclose the value in double quotes since the multiple metadata service URIs are separated with semicolons.
Step 3: Deploy a BookKeeper cluster
BookKeeper handles all persistent data storage in Pulsar. You need to deploy a cluster of BookKeeper bookies to use Pulsar. You can choose to run a 3-bookie BookKeeper cluster.
Configure BookKeeper
BookKeeper configuration is split across two files:
conf/bookkeeper.conf: Contains all BookKeeper runtime parameters, including metadata store connection, storage directories, compaction settings, and disk usage thresholds.conf/bkenv.sh: Contains JVM-related parameters for the Bookie process, including memory allocation (BOOKIE_MEM), garbage collection options (BOOKIE_GC), and extra JVM flags (BOOKIE_EXTRA_OPTS).
Metadata store connection
You can configure BookKeeper bookies using the conf/bookkeeper.conf configuration file. The most important step in configuring bookies for our purposes here is ensuring that metadataServiceUri is set to the URI for the ZooKeeper cluster. The following is an example:
metadataServiceUri=zk://zk1.us-west.example.com:2181;zk2.us-west.example.com:2181;zk3.us-west.example.com:2181/ledgers
Use ; as the separator in metadataServiceUri.
For more information about ZooKeeper and BookKeeper administration, see ZooKeeper and BookKeeper administration.
Storage directories
In a production environment, you should configure dedicated disks for journal and ledger storage. Keeping them on separate disks significantly improves write performance.
# WAL (Write-Ahead Log) directory — use a dedicated SSD for low-latency writes
journalDirectory=/data/bookkeeper/journal

# Ledger storage directory — use a separate disk from the journal
ledgerDirectories=/data/bookkeeper/ledgers
journalDirectory: Defaults todata/bookkeeper/journal. The journal is a write-ahead log that records every write before it is applied to the ledger storage. Using a dedicated high-speed SSD for the journal directory is critical for write latency.ledgerDirectories: Defaults todata/bookkeeper/ledgers. This is where the actual ledger data is stored. Separating it from the journal directory avoids I/O contention and improves throughput.
GC and Compaction
BookKeeper writes entries from multiple ledgers into shared Entry Log files (default max 1 GB each, controlled by logSizeLimit). When ledgers are deleted — for example, after Pulsar's retention policy trims expired data — the Entry Log files that contained those ledgers develop unused space. The Bookie's GC thread periodically scans for deleted ledgers and triggers compaction to reclaim disk space by rewriting the remaining valid entries into new files.
BookKeeper provides two levels of compaction:
- Minor Compaction: Targets Entry Log files where the valid data ratio is below
minorCompactionThreshold(default 0.2, i.e., 20%). Runs atminorCompactionInterval(default: every hour). Designed to quickly reclaim heavily fragmented files. - Major Compaction: Targets Entry Log files where the valid data ratio is below
majorCompactionThreshold(default 0.5, i.e., 50%). Runs atmajorCompactionInterval(default: every day). Covers a wider range of files with moderate fragmentation.
# GC scan interval (ms), default: 900000 (15 min)
gcWaitTime=900000

# Minor Compaction: threshold and interval
minorCompactionThreshold=0.2
minorCompactionInterval=3600

# Major Compaction: threshold and interval
majorCompactionThreshold=0.5
majorCompactionInterval=86400
minorCompactionInterval and majorCompactionInterval must be greater than gcWaitTime, otherwise compaction will not run.
Disk usage thresholds
BookKeeper monitors disk usage and can automatically switch a Bookie to read-only mode to prevent disk exhaustion.
# Bookie enters read-only mode when disk usage exceeds this threshold (default: 0.95)
diskUsageThreshold=0.95

# Warning threshold — Major Compaction is paused when disk usage exceeds this value (default: 0.90)
diskUsageWarnThreshold=0.90

# Low water mark — Bookie returns to read-write mode only after disk usage drops below this value
# Set it lower than diskUsageWarnThreshold to avoid frequent mode switching (recommended: 0.87)
diskUsageLwmThreshold=0.87
JVM configuration (bkenv.sh)
The conf/bkenv.sh file controls JVM parameters for the Bookie process:
-
BOOKIE_MEM: Defaults to-Xms2g -Xmx2g -XX:MaxDirectMemorySize=2g. Adjust based on your storage workload. Insufficient heap memory leads to frequent GC, which increases write and read latency — especially under high throughput, GC pauses can cause write timeouts. Direct memory is primarily used for Netty ByteBuf allocation — BookKeeper defaults to thePooledDirectmemory allocator, which allocates all ByteBuf from direct memory for network I/O and internal data handling.# Example: increase heap and direct memory for high-throughput workloadsBOOKIE_MEM="-Xms4g -Xmx4g -XX:MaxDirectMemorySize=4g" -
BOOKIE_EXTRA_OPTS: Passes additional JVM flags to the Bookie process. Examples:# Enable heap dump on OOM (the default script only enables ExitOnOutOfMemoryError,# without a heap dump file you cannot diagnose the root cause)BOOKIE_EXTRA_OPTS="-XX:+HeapDumpOnOutOfMemoryError -XX:HeapDumpPath=/data/logs/bookie/heapdump.hprof"# Temporarily enable Netty leak detection for troubleshooting off-heap memory leaks# (default is disabled; set to advanced level when investigating)BOOKIE_EXTRA_OPTS="-Dio.netty.leakDetection.level=advanced"
After you finish editing both conf/bookkeeper.conf and conf/bkenv.sh, you can find a full listing of the available BookKeeper configuration parameters here. However, consulting the BookKeeper documentation for a more in-depth guide might be a better choice.
Start BookKeepers
With the desired configuration applied in conf/bookkeeper.conf and conf/bkenv.sh, you can start up a bookie on each of your BookKeeper hosts. You can start up each bookie either in the background, using nohup, or in the foreground.
To start the bookie in the background, use the pulsar-daemon CLI tool:
bin/pulsar-daemon start bookie
To start the bookie in the foreground:
bin/pulsar bookie
You can verify that a bookie works properly by running the bookiesanity command on the BookKeeper shell:
bin/bookkeeper shell bookiesanity
This command creates an ephemeral BookKeeper ledger on the local bookie, writes a few entries, reads them back, and finally deletes the ledger.
After you start all the bookies, you can use simpletest command for BookKeeper shell on any bookie node, to verify all the bookies in the cluster are up running.
bin/bookkeeper shell simpletest --ensemble <num-bookies> --writeQuorum <num-bookies> --ackQuorum <num-bookies> --numEntries <num-entries>
This command creates a num-bookies sized ledger on the cluster, writes a few entries, and finally deletes the ledger.
Step 4: Deploy Pulsar brokers
Pulsar brokers are the last thing you need to deploy in your Pulsar cluster. Brokers handle Pulsar messages and provide the administrative interface of Pulsar. A good choice is to run 3 brokers, one for each machine that already runs a BookKeeper bookie.
Configure Brokers
Broker configuration is split across two files:
conf/broker.conf: Contains all Broker runtime parameters, including metadata store connection, cluster name, ports, replication settings, and feature toggles.conf/pulsar_env.sh: Contains JVM-related parameters for the Broker process, including memory allocation (PULSAR_MEM), garbage collection options (PULSAR_GC), and extra JVM flags (PULSAR_EXTRA_OPTS).
Metadata store and cluster settings
You can configure brokers using the conf/broker.conf configuration file. The most important element of broker configuration is ensuring that each broker is aware of the ZooKeeper cluster that you have deployed. Ensure that the metadataStoreUrl and configurationMetadataStoreUrl parameters are correct. In this case, since you only have 1 cluster and no configuration store setup, the configurationMetadataStoreUrl point to the same metadataStoreUrl.
metadataStoreUrl=zk:zk1.us-west.example.com:2181,zk2.us-west.example.com:2181,zk3.us-west.example.com:2181
configurationMetadataStoreUrl=zk:zk1.us-west.example.com:2181,zk2.us-west.example.com:2181,zk3.us-west.example.com:2181
You also need to specify the cluster name (matching the name that you provided when you initialize the metadata of the cluster):
clusterName=pulsar-cluster-1
In addition, you need to match the broker and web service ports provided when you initialize the metadata of the cluster (especially when you use a different port than the default):
brokerServicePort=6650
brokerServicePortTls=6651
webServicePort=8080
webServicePortTls=8443
Managed ledger settings
These parameters control how the Broker creates BookKeeper ledgers for message storage. They map to the BookKeeper protocol's Ensemble / Write Quorum / Ack Quorum model:
# Ensemble size (E): number of bookies to use when creating a ledger (default: 2)
managedLedgerDefaultEnsembleSize=2

# Write quorum (Qw): number of copies to store for each entry (default: 2)
managedLedgerDefaultWriteQuorum=2

# Ack quorum (Qa): number of acks to wait before a write is considered complete (default: 2)
managedLedgerDefaultAckQuorum=2
The invariant E ≥ Qw ≥ Qa must hold; otherwise ledger creation will fail.
If you deploy Pulsar in a one-node cluster, you should set all three values to
1.
JVM configuration (pulsar_env.sh)
The conf/pulsar_env.sh file controls JVM parameters for the Broker process:
-
PULSAR_MEM: Defaults to-Xms2g -Xmx2g -XX:MaxDirectMemorySize=4g. Adjust based on your machine's available memory. Insufficient heap memory leads to frequent GC, and GC pauses increase message publish and consume latency — in severe cases, Full GC can make the Broker temporarily unavailable. Direct memory is critical for the Broker's message caching and Netty I/O operations.# Example: increase heap and direct memory for production workloadsPULSAR_MEM="-Xms4g -Xmx4g -XX:MaxDirectMemorySize=8g" -
PULSAR_EXTRA_OPTS: Passes additional JVM flags to the Broker/Proxy/ZooKeeper process. SincePULSAR_EXTRA_OPTSis appended after other JVM options on the command line, it can also be used to override existing JVM parameters defined inpulsar_env.shor thebin/pulsarstartup script (later flags take precedence). Examples:# Enable heap dump on OOM (the default script only enables ExitOnOutOfMemoryError,# without a heap dump file you cannot diagnose the root cause after the process exits)PULSAR_EXTRA_OPTS="-XX:+HeapDumpOnOutOfMemoryError -XX:HeapDumpPath=/data/logs/pulsar/heapdump.hprof"# Enable IPv6 support (the default script sets -Djava.net.preferIPv4Stack=true;# override this if your deployment uses IPv6 networking)PULSAR_EXTRA_OPTS="-Djava.net.preferIPv4Stack=false"# Tune Netty memory pool parameters (increase maxOrder and maxCachedBufferCapacity# if your messages are large, to avoid Netty bypassing the memory pool for allocation)PULSAR_EXTRA_OPTS="-Dio.netty.allocator.maxOrder=13 -Dio.netty.allocator.numDirectArenas=8 -Dio.netty.allocator.maxCachedBufferCapacity=1048576"
You can also refer to the default configuration in the Pulsar Helm Chart values.yaml as a tuning reference.
Enable Pulsar Functions (optional)
If you want to enable Pulsar Functions, you can follow the instructions as below:
-
Edit
conf/broker.confto enable functions worker, by settingfunctionsWorkerEnabledtotrue.functionsWorkerEnabled=true -
Edit
conf/functions_worker.ymland setpulsarFunctionsClusterto the cluster name that you provide when you initialize the metadata of the cluster.pulsarFunctionsCluster: pulsar-cluster-1
If you want to learn more options about deploying the functions worker, check out Deploy and manage functions worker.
Start Brokers
You can then provide any other configuration changes that you want in the conf/broker.conf file. Once you decide on a configuration, you can start up the brokers for your Pulsar cluster. Like ZooKeeper and BookKeeper, you can start brokers either in the foreground or in the background, using nohup.
You can start a broker in the foreground using the pulsar broker command:
bin/pulsar broker
You can start a broker in the background using the pulsar-daemon CLI tool:
bin/pulsar-daemon start broker
Once you successfully start up all the brokers that you intend to use, your Pulsar cluster should be ready to go!
Connect to the running cluster
Once your Pulsar cluster is up and running, you should be able to connect with it using Pulsar clients. One such client is the pulsar-client tool, which is included with the Pulsar binary package. The pulsar-client tool can publish messages to and consume messages from Pulsar topics and thus provide a simple way to make sure that your cluster runs properly.
To use the pulsar-client tool, first modify the client configuration file in conf/client.conf in your binary package. You need to change the values for webServiceUrl and brokerServiceUrl, substituting localhost (which is the default), with the DNS name that you assign to your broker/bookie hosts. The following is an example:
webServiceUrl=http://us-west.example.com:8080
brokerServiceurl=pulsar://us-west.example.com:6650
If you do not have a DNS server, you can specify multi-host in service URL as follows:
webServiceUrl=http://host1:8080,host2:8080,host3:8080
brokerServiceurl=pulsar://host1:6650,host2:6650,host3:6650
Once that is complete, you can publish a message to the Pulsar topic:
bin/pulsar-client produce \
    persistent://public/default/test \
    -n 1 \
    -m "Hello Pulsar"
This command publishes a single message to the Pulsar topic. In addition, you can subscribe to the Pulsar topic in a different terminal before publishing messages as below:
bin/pulsar-client consume \
    persistent://public/default/test \
    -n 100 \
    -s "consumer-test" \
    -t "Exclusive"
Once you successfully publish the above message to the topic, you should see it in the standard output:
----- got message -----
key:[null], properties:[], content:Hello Pulsar
Run Functions
If you have enabled Pulsar Functions, you can try out the Pulsar Functions now.
Create an ExclamationFunction exclamation.
bin/pulsar-admin functions create \
    --jar $PWD/examples/api-examples.jar \
    --classname org.apache.pulsar.functions.api.examples.ExclamationFunction \
    --inputs persistent://public/default/exclamation-input \
    --output persistent://public/default/exclamation-output \
    --tenant public \
    --namespace default \
    --name exclamation
Check whether the function runs as expected by triggering the function.
bin/pulsar-admin functions trigger --name exclamation --trigger-value "hello world"
You should see the following output:
hello world!