Use filesystem offloader with Pulsar
This chapter guides you through every step of installing and configuring the filesystem offloader and using it with Pulsar.
Installation
This section describes how to install the filesystem offloader.
Prerequisite
- Pulsar: 2.4.2 or higher versions
Steps
- Download the Pulsar tarball.
- Download and untar the Pulsar offloaders package, then copy the Pulsar offloaders as
offloadersin the Pulsar directory. See Install tiered storage offloaders.
Configuration
Before offloading data from BookKeeper to filesystem, you need to configure some properties of the filesystem offloader driver.
Besides, you can also configure the filesystem offloader to run it automatically or trigger it manually.
Configure filesystem offloader driver
You can configure the filesystem offloader driver in the broker.conf or standalone.conf configuration file.
- HDFS
- NFS
-
Required configurations are as below.
Parameter Description Example value managedLedgerOffloadDriverOffloader driver name, which is case-insensitive. filesystem fileSystemURIConnection address, which is the URI to access the default Hadoop distributed file system. hdfs://127.0.0.1:9000 offloadersDirectoryOffloader directory offloaders fileSystemProfilePathHadoop profile path. The configuration file is stored in the Hadoop profile path. It contains various settings for Hadoop performance tuning. conf/filesystem_offload_core_site.xml -
Optional configurations are as below.
Parameter Description Example value managedLedgerMinLedgerRolloverTimeMinutesMinimum time between ledger rollover for a topic.
Note: it is not recommended to set this parameter in the production environment.10 managedLedgerMaxEntriesPerLedgerMaximum number of entries to append to a ledger before triggering a rollover.
Note: it is not recommended to set this parameter in the production environment.50000
-
Required configurations are as below.
Parameter Description Example value managedLedgerOffloadDriverOffloader driver name, which is case-insensitive. filesystem offloadersDirectoryOffloader directory offloaders fileSystemProfilePathNFS profile path. The configuration file is stored in the NFS profile path. It contains various settings for performance tuning. conf/filesystem_offload_core_site.xml -
Optional configurations are as below.
Parameter Description Example value managedLedgerMinLedgerRolloverTimeMinutesMinimum time between ledger rollover for a topic.
Note: it is not recommended to set this parameter in the production environment.10 managedLedgerMaxEntriesPerLedgerMaximum number of entries to append to a ledger before triggering a rollover.
Note: it is not recommended to set this parameter in the production environment.50000
Run filesystem offloader automatically
You can configure the namespace policy to offload data automatically once a threshold is reached. The threshold is based on the size of data that a topic has stored on a Pulsar cluster. Once the topic storage reaches the threshold, an offload operation is triggered automatically.
| Threshold value | Action |
|---|---|
| > 0 | It triggers the offloading operation if the topic storage reaches its threshold. |
| = 0 | It causes a broker to offload data as soon as possible. |
| < 0 | It disables automatic offloading operation. |
Automatic offload runs when a new segment is added to a topic log. If you set the threshold on a namespace, but few messages are being produced to the topic, the filesystem offloader does not work until the current segment is full.
You can configure the threshold using CLI tools, such as pulsar-admin.
Example
This example sets the filesystem offloader threshold to 10 MB using pulsar-admin.
pulsar-admin namespaces set-offload-threshold --size 10M my-tenant/my-namespace
For more information about the pulsar-admin namespaces set-offload-threshold options command, including flags, descriptions, default values, and shorthands, see Pulsar admin docs.
Run filesystem offloader manually
For individual topics, you can trigger the filesystem offloader manually using one of the following methods:
-
Use the REST endpoint.
-
Use CLI tools (such as pulsar-admin).
To manually trigger the filesystem offloader via CLI tools, you need to specify the maximum amount of data (threshold) that should be retained on a Pulsar cluster for a topic. If the size of the topic data on the Pulsar cluster exceeds this threshold, segments from the topic are offloaded to the filesystem until the threshold is no longer exceeded. Older segments are offloaded first.
Example
-
This example manually runs the filesystem offloader using pulsar-admin.
pulsar-admin topics offload --size-threshold 10M persistent://my-tenant/my-namespace/topic1Output
Offload triggered for persistent://my-tenant/my-namespace/topic1 for messages before 2:0:-1tipFor more information about the
pulsar-admin topics offload optionscommand, including flags, descriptions, default values, and shorthands, see Pulsar admin docs. -
This example checks filesystem offloader status using pulsar-admin.
pulsar-admin topics offload-status persistent://my-tenant/my-namespace/topic1Output
Offload is currently runningTo wait for the filesystem to complete the job, add the
-wflag.pulsar-admin topics offload-status -w persistent://my-tenant/my-namespace/topic1Output
Offload was a successIf there is an error in the offloading operation, the error is propagated to the
pulsar-admin topics offload-statuscommand.pulsar-admin topics offload-status persistent://my-tenant/my-namespace/topic1Output
Error in offload
null

Reason: Error offloading: org.apache.bookkeeper.mledger.ManagedLedgerException: java.util.concurrent.CompletionException: com.amazonaws.services.s3.model.AmazonS3Exception: Anonymous users cannot initiate multipart uploads. Please authenticate. (Service: Amazon S3; Status Code: 403; Error Code: AccessDenied; Request ID: 798758DE3F1776DF; S3 Extended Request ID: dhBFz/lZm1oiG/oBEepeNlhrtsDlzoOhocuYMpKihQGXe6EG8puRGOkK6UwqzVrMXTWBxxHcS+g=), S3 Extended Request ID: dhBFz/lZm1oiG/oBEepeNlhrtsDlzoOhocuYMpKihQGXe6EG8puRGOkK6UwqzVrMXTWBxxHcS+g=tipFor more information about the
pulsar-admin topics offload-status optionscommand, including flags, descriptions, default values, and shorthands, see Pulsar admin docs.
Tutorial
This section provides step-by-step instructions on how to use the filesystem offloader to move data from Pulsar to Hadoop Distributed File System (HDFS) or Network File system (NFS).
Offload data to HDFS
This tutorial sets up a Hadoop single node cluster and uses Hadoop 3.2.1. For details about how to set up a Hadoop single node cluster, see here.
Step 1: Prepare the HDFS environment
-
Download and uncompress Hadoop 3.2.1.
wget https://mirrors.bfsu.edu.cn/apache/hadoop/common/hadoop-3.2.1/hadoop-3.2.1.tar.gz

tar -zxvf hadoop-3.2.1.tar.gz -C $HADOOP_HOME -
Configure Hadoop.
# $HADOOP_HOME/etc/hadoop/core-site.xml
<configuration>
    <property>
        <name>fs.defaultFS</name>
        <value>hdfs://localhost:9000</value>
    </property>
</configuration>

# $HADOOP_HOME/etc/hadoop/hdfs-site.xml
<configuration>
    <property>
        <name>dfs.replication</name>
        <value>1</value>
    </property>
</configuration> -
Set passphraseless ssh.
# Now check that you can ssh to the localhost without a passphrase:
ssh localhost
# If you cannot ssh to localhost without a passphrase, execute the following commands
ssh-keygen -t rsa -P '' -f ~/.ssh/id_rsa
cat ~/.ssh/id_rsa.pub >> ~/.ssh/authorized_keys
chmod 0600 ~/.ssh/authorized_keys -
Start HDFS.
# don't execute this command repeatedly, repeat execute will cauld the clusterId of the datanode is not consistent with namenode
$HADOOP_HOME/bin/hadoop namenode -format
$HADOOP_HOME/sbin/start-dfs.sh -
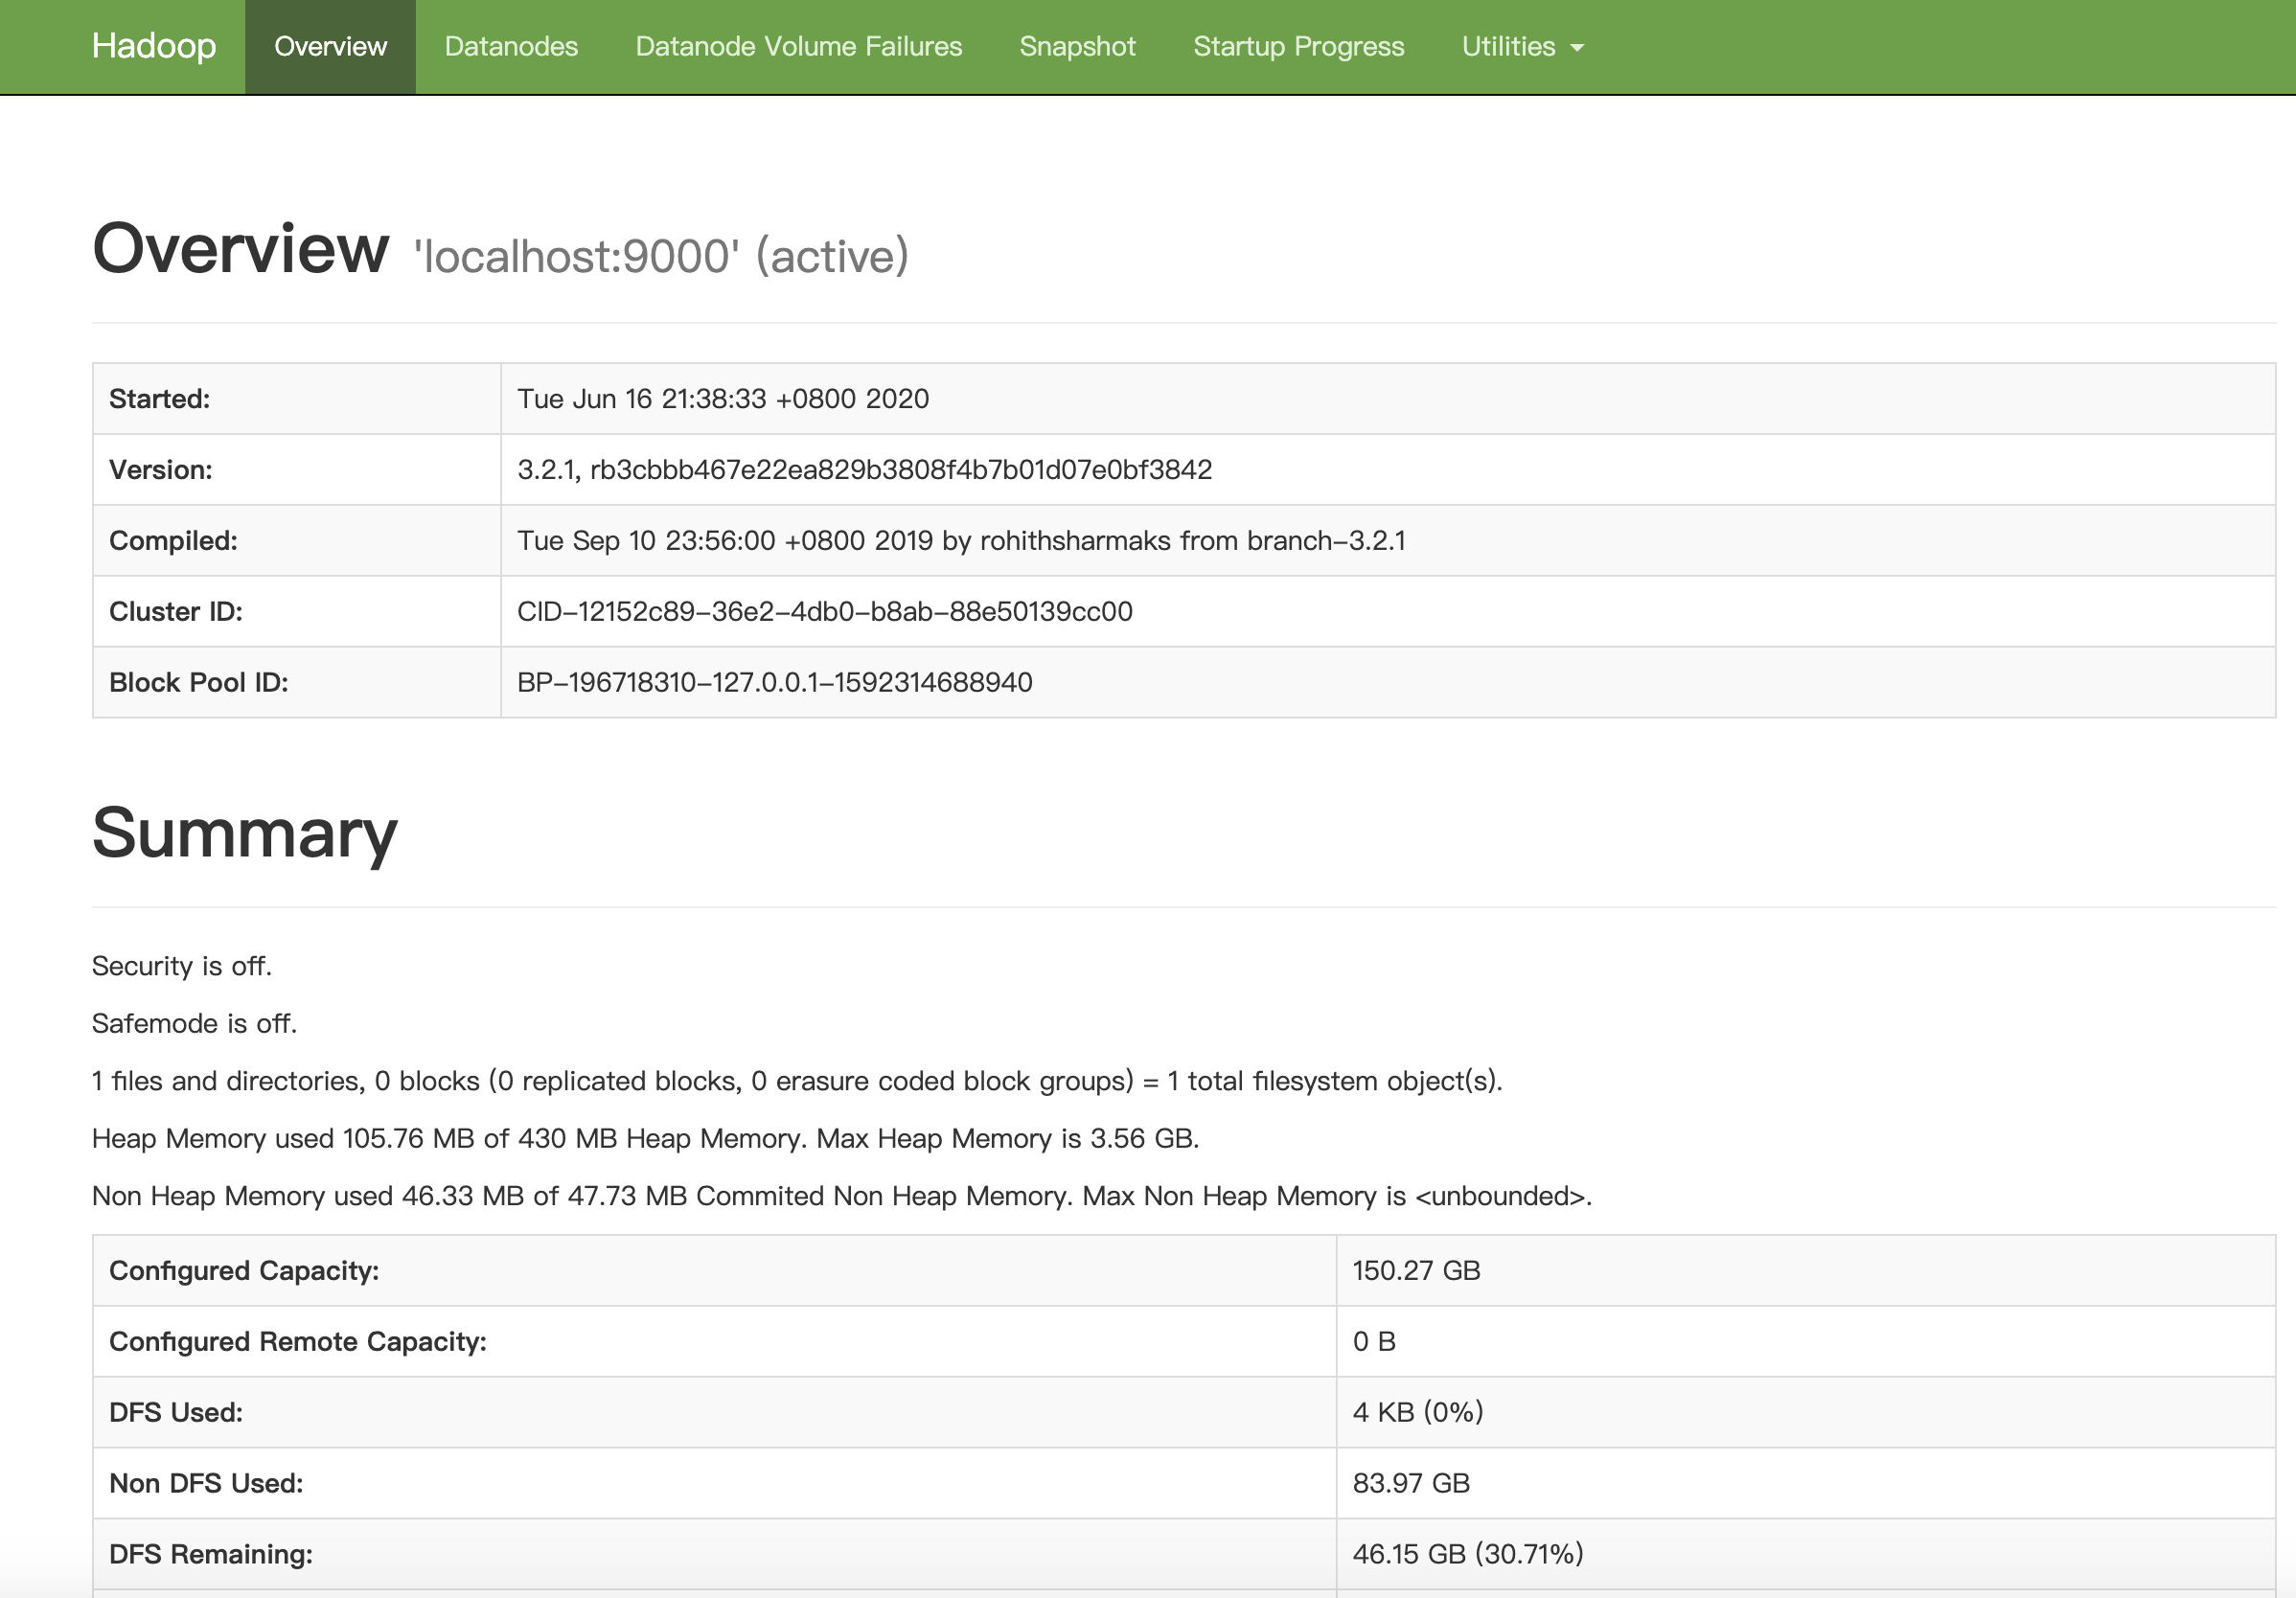
Navigate to the HDFS website.
You can see the Overview page.
-
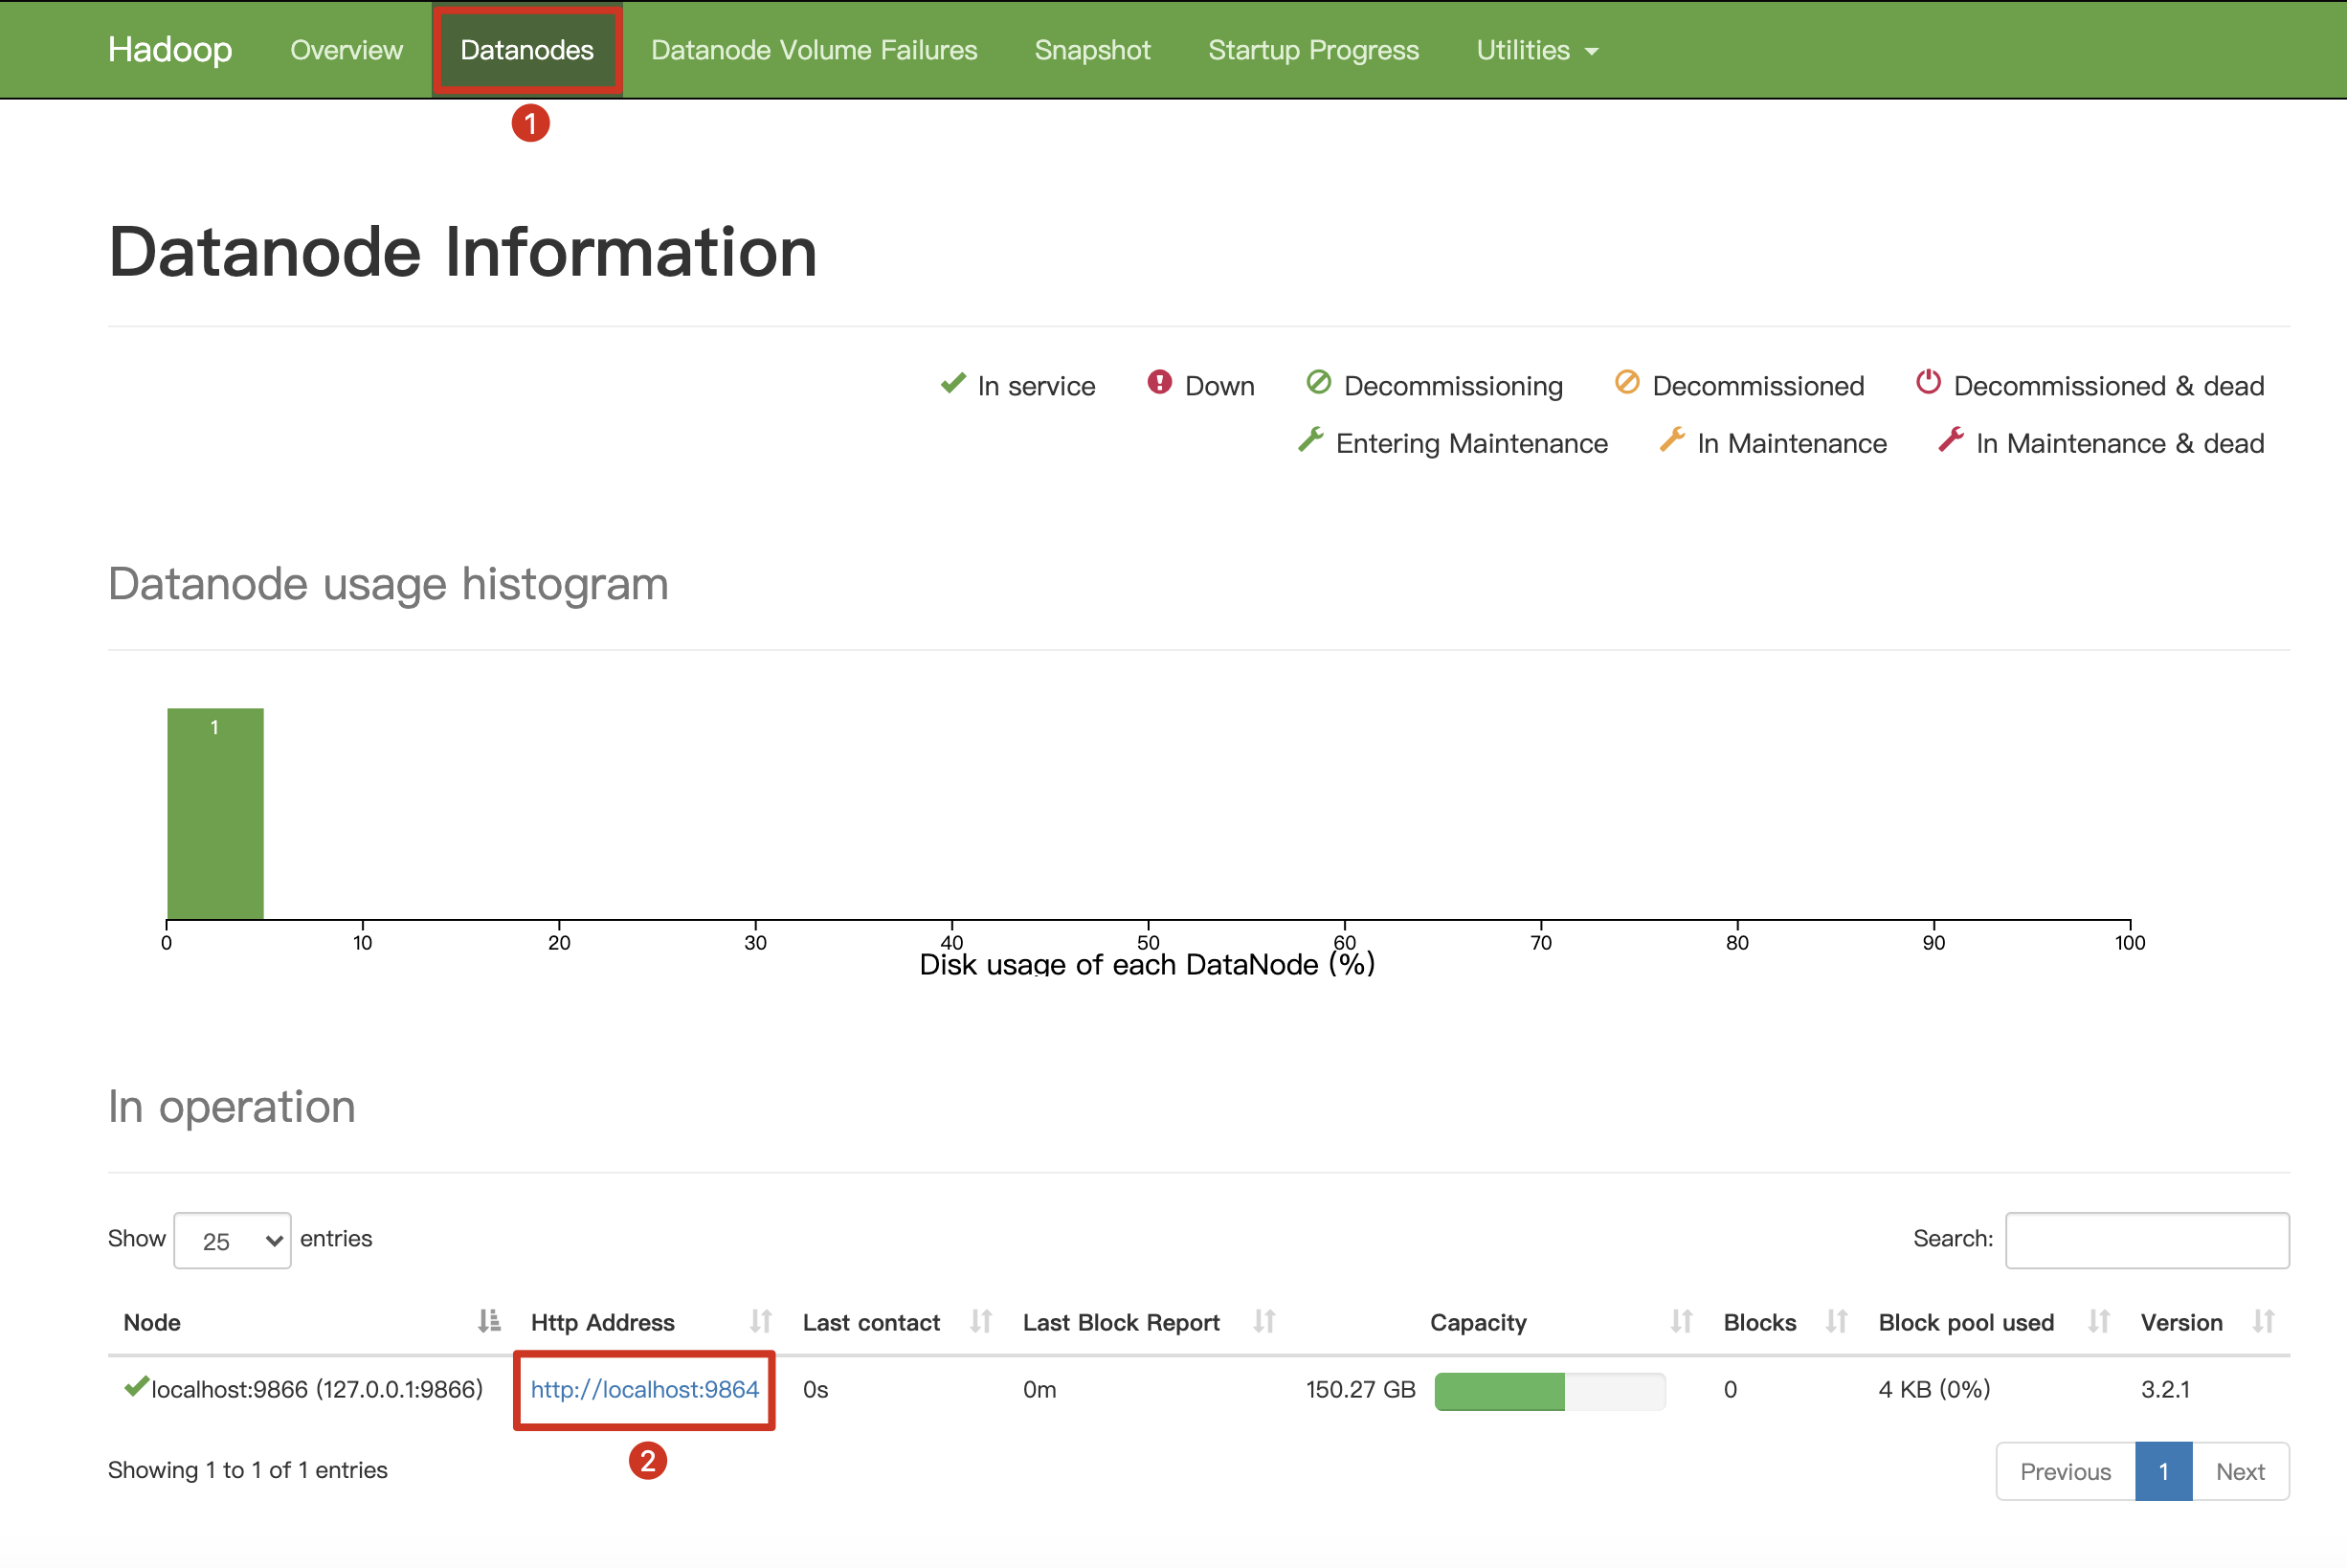
At the top navigation bar, click Datanodes to check DataNode information.
-
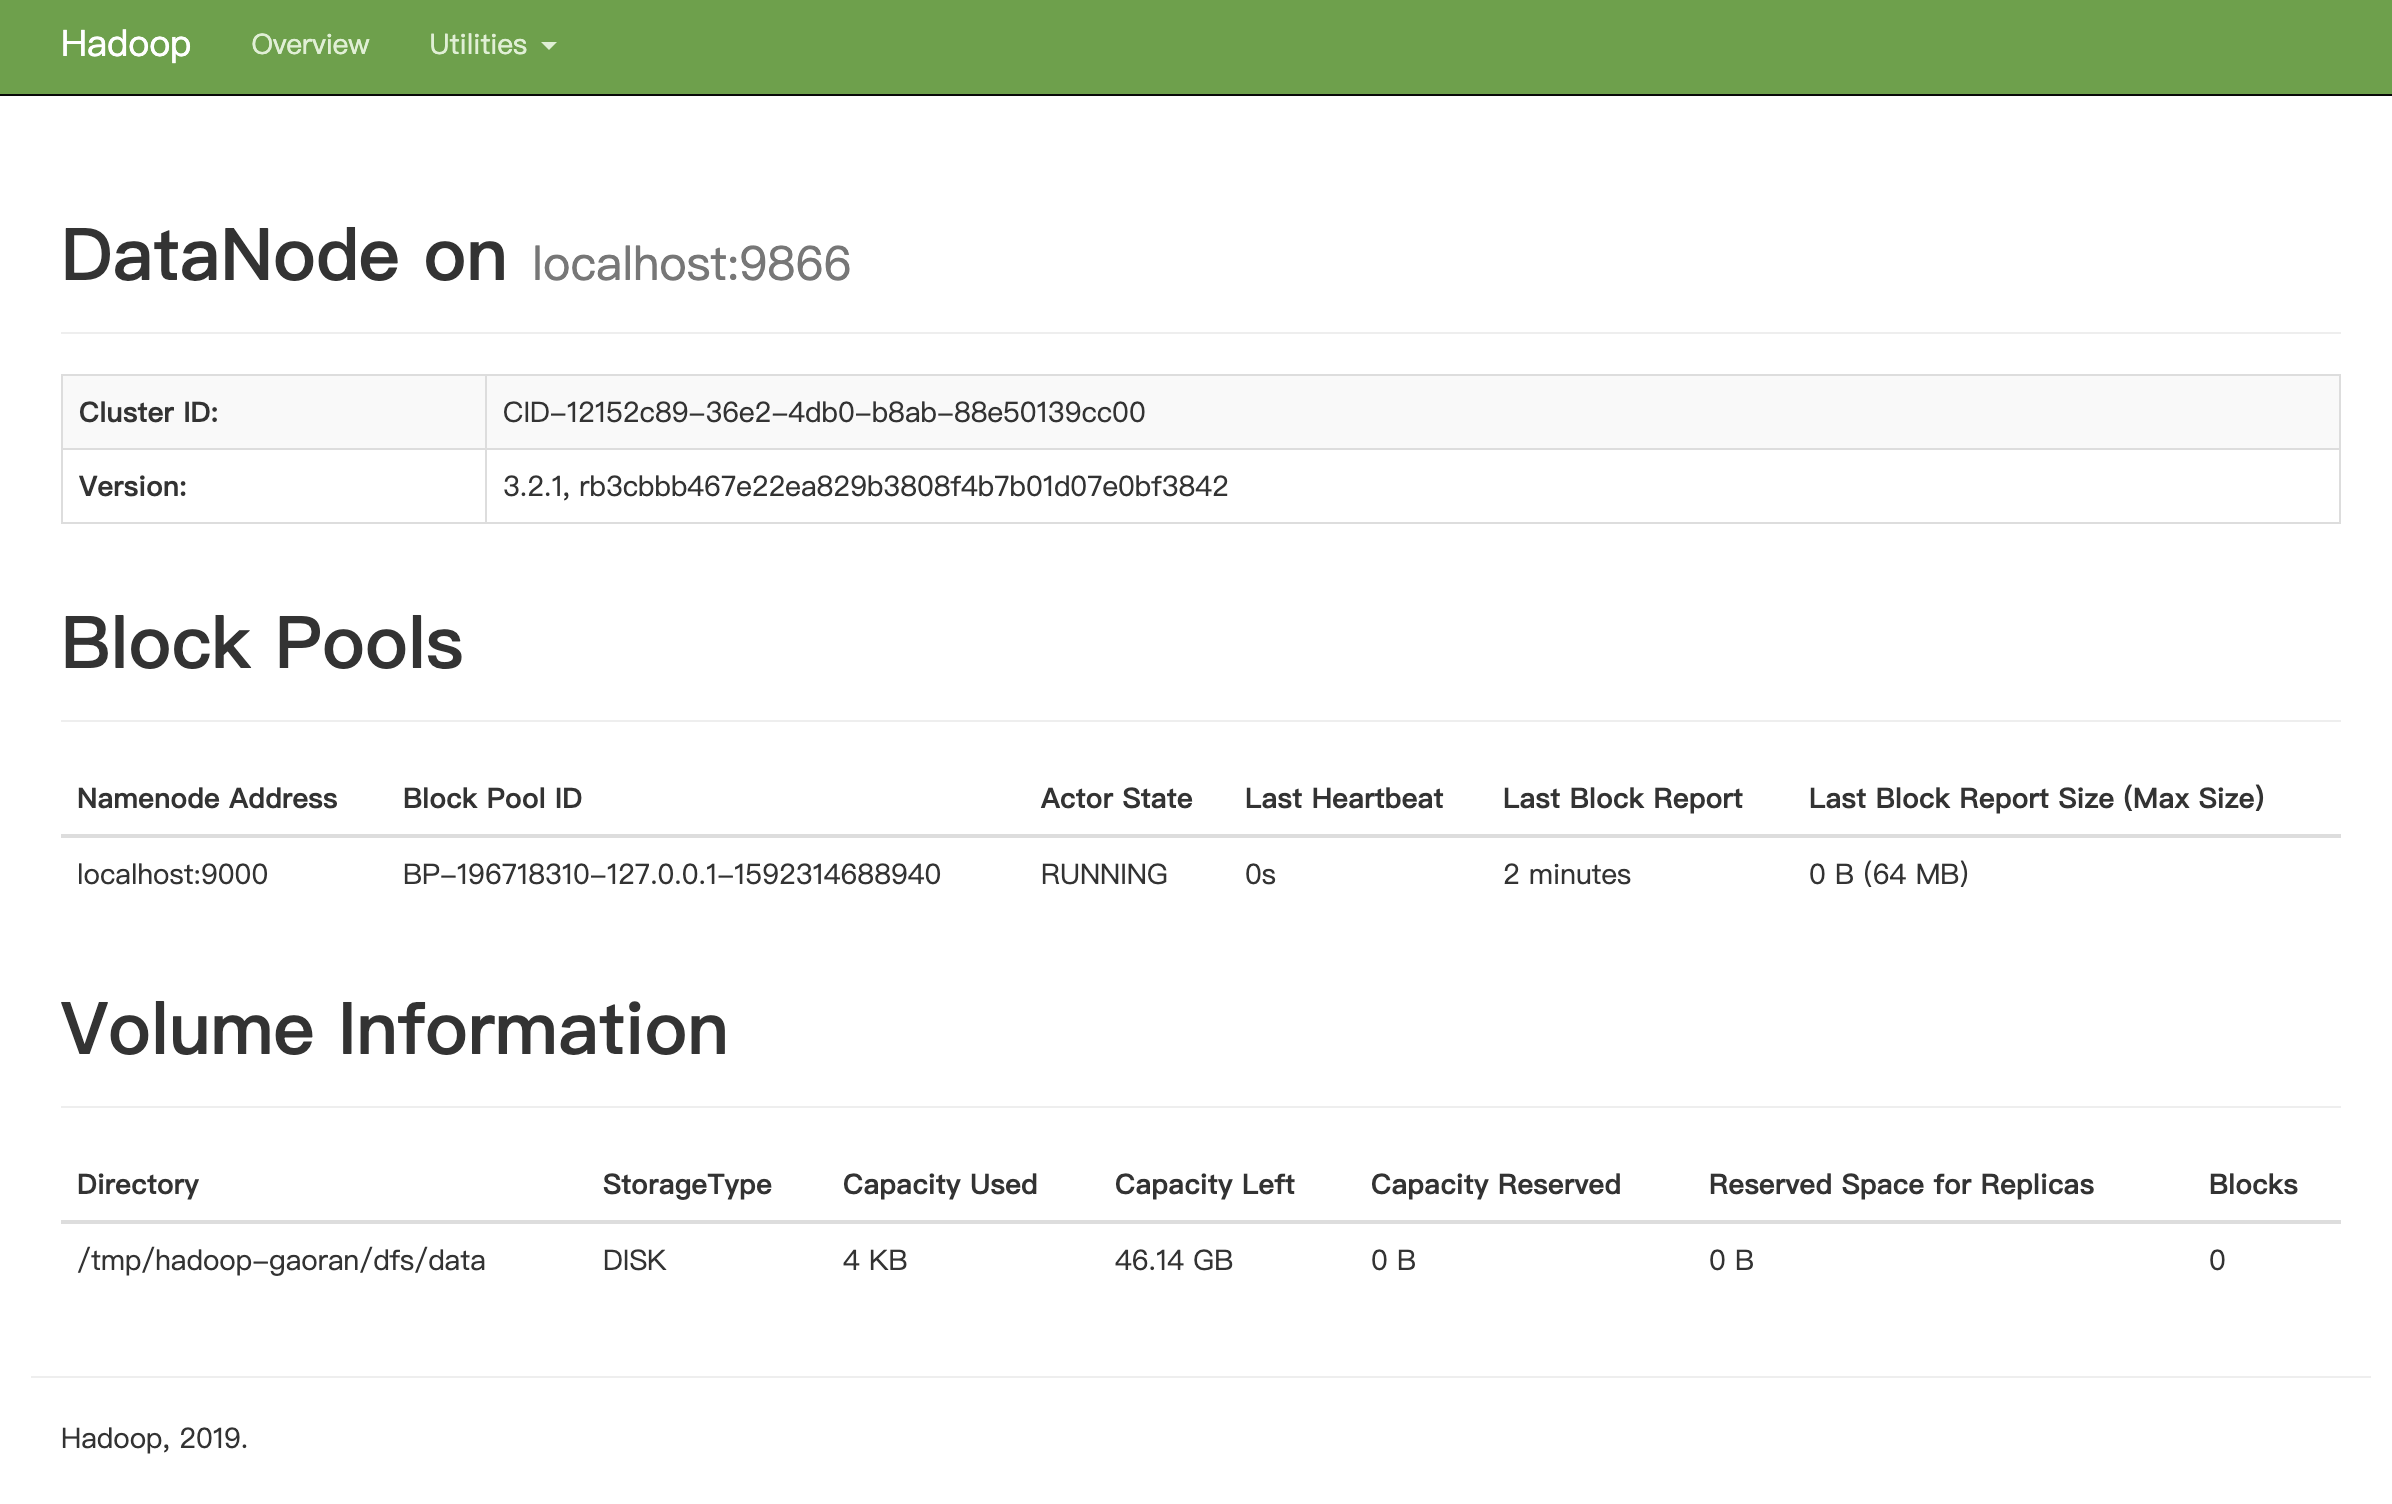
Click HTTP Address to get more detailed information about localhost:9866.
As can be seen below, the size of Capacity Used is 4 KB, which is the initial value.
-
Step 2: Install the filesystem offloader
For details, see installation.
Step 3: Configure the filesystem offloader
As indicated in the configuration section, you need to configure some properties for the filesystem offloader driver before using it. This tutorial assumes that you have configured the filesystem offloader driver as below and run Pulsar in standalone mode.
Set the following configurations in the conf/standalone.conf file.
managedLedgerOffloadDriver=filesystem
fileSystemURI=hdfs://127.0.0.1:9000
fileSystemProfilePath=conf/filesystem_offload_core_site.xml
For testing purposes, you can set the following two configurations to speed up ledger rollover, but it is not recommended that you set them in the production environment.
managedLedgerMinLedgerRolloverTimeMinutes=1
managedLedgerMaxEntriesPerLedger=100
Step 4: Offload data from BookKeeper to filesystem
Execute the following commands in the repository where you download Pulsar tarball. For example, ~/path/to/apache-pulsar-2.5.1.
-
Start Pulsar standalone.
bin/pulsar standalone -a 127.0.0.1 -
To ensure the data generated is not deleted immediately, it is recommended to set the retention policy, which can be either a size limit or a time limit. The larger value you set for the retention policy, the longer the data can be retained.
bin/pulsar-admin namespaces set-retention public/default --size 100M --time 2dtipFor more information about the
pulsarctl namespaces set-retention optionscommand, including flags, descriptions, default values, and shorthands, see here. -
Produce data using pulsar-client.
bin/pulsar-client produce -m "Hello FileSystem Offloader" -n 1000 public/default/fs-test -
The offloading operation starts after a ledger rollover is triggered. To ensure offload data successfully, it is recommended that you wait until several ledger rollovers are triggered. In this case, you might need to wait for a second. You can check the ledger status using pulsarctl.
bin/pulsar-admin topics stats-internal public/default/fs-testOutput
The data of the ledger 696 is not offloaded.
{
"version": 1,
"creationDate": "2020-06-16T21:46:25.807+08:00",
"modificationDate": "2020-06-16T21:46:25.821+08:00",
"ledgers": [
{
    "ledgerId": 696,
    "isOffloaded": false
}
],
"cursors": {}
} -
Wait for a second and send more messages to the topic.
bin/pulsar-client produce -m "Hello FileSystem Offloader" -n 1000 public/default/fs-test -
Check the ledger status using pulsarctl.
bin/pulsar-admin topics stats-internal public/default/fs-testOutput
The ledger 696 is rolled over.
{
"version": 2,
"creationDate": "2020-06-16T21:46:25.807+08:00",
"modificationDate": "2020-06-16T21:48:52.288+08:00",
"ledgers": [
{
    "ledgerId": 696,
    "entries": 1001,
    "size": 81695,
    "isOffloaded": false
},
{
    "ledgerId": 697,
    "isOffloaded": false
}
],
"cursors": {}
} -
Trigger the offloading operation manually using pulsarctl.
bin/pulsar-admin topics offload -s 0 public/default/fs-testOutput
Data in ledgers before the ledger 697 is offloaded.
# offload info, the ledgers before 697 will be offloaded
Offload triggered for persistent://public/default/fs-test3 for messages before 697:0:-1 -
Check the ledger status using pulsarctl.
bin/pulsar-admin topics stats-internal public/default/fs-test
Output
The data of the ledger 696 is offloaded.
{
"version": 4,
"creationDate": "2020-06-16T21:46:25.807+08:00",
"modificationDate": "2020-06-16T21:52:13.25+08:00",
"ledgers": [
{
    "ledgerId": 696,
    "entries": 1001,
    "size": 81695,
    "isOffloaded": true
},
{
    "ledgerId": 697,
    "isOffloaded": false
}
],
"cursors": {}
}
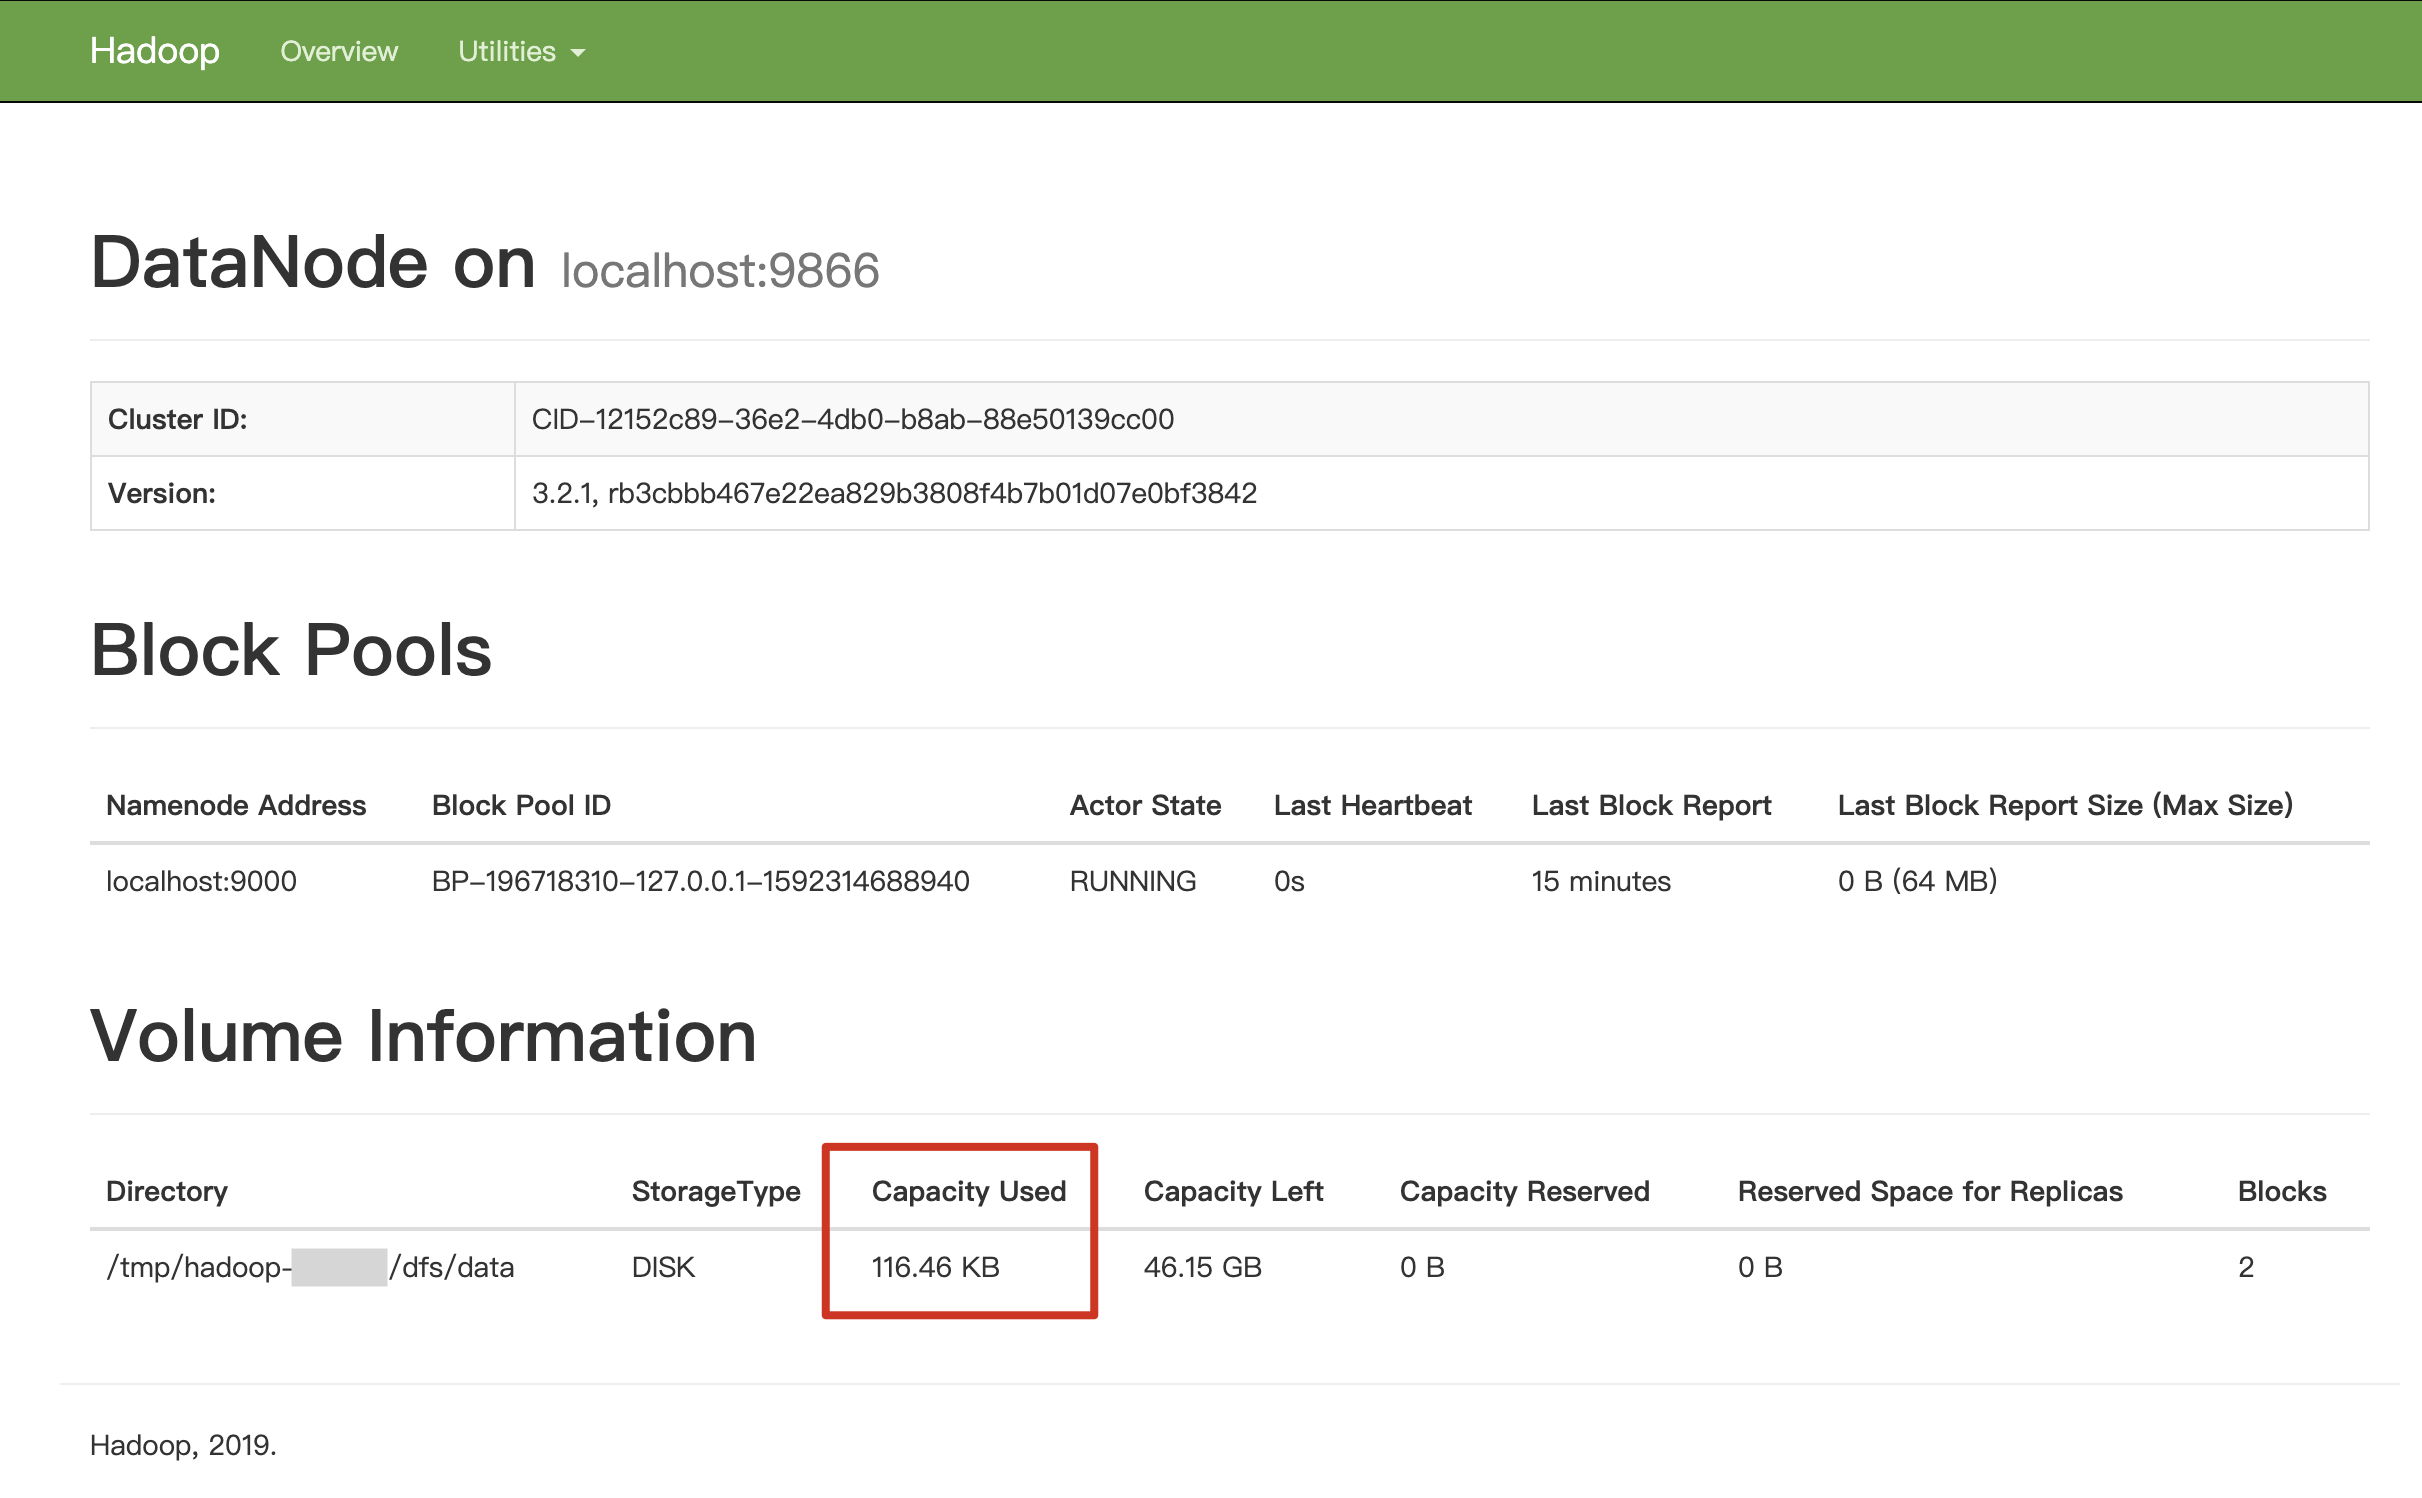
And the Capacity Used is changed from 4 KB to 116.46 KB.
Offload data to NFS
In this section, it is assumed that you have enabled NFS service and set the shared path of your NFS service. In this section, /Users/test is used as the shared path of NFS service.
Step 1: Install the filesystem offloader
For details, see installation.
Step 2: Mount your NFS to your local filesystem
This example mounts /Users/pulsar_nfs to /Users/test.
mount -e 192.168.0.103:/Users/test/Users/pulsar_nfs
Step 3: Configure the filesystem offloader driver
As indicated in the configuration section, you need to configure some properties for the filesystem offloader driver before using it. This tutorial assumes that you have configured the filesystem offloader driver as below and run Pulsar in standalone mode.
-
Set the following configurations in the
conf/standalone.conffile.managedLedgerOffloadDriver=filesystem
fileSystemProfilePath=conf/filesystem_offload_core_site.xml -
Modify the filesystem_offload_core_site.xml as follows.
<property>
    <name>fs.defaultFS</name>
    <value>file:///</value>
</property>

<property>
    <name>hadoop.tmp.dir</name>
    <value>file:///Users/pulsar_nfs</value>
</property>

<property>
    <name>io.file.buffer.size</name>
    <value>4096</value>
</property>

<property>
    <name>io.seqfile.compress.blocksize</name>
    <value>1000000</value>
</property>
<property>

    <name>io.seqfile.compression.type</name>
    <value>BLOCK</value>
</property>

<property>
    <name>io.map.index.interval</name>
    <value>128</value>
</property>
Step 4: Offload data from BookKeeper to filesystem
Refer to the step 4 of Offload data to HDFS.
Read offloaded data from filesystem
-
The offloaded data is stored as
MapFilein the following new path of the filesystem:path = storageBasePath + "/" + managedLedgerName + "/" + ledgerId + "-" + uuid.toString();storageBasePathis the value ofhadoop.tmp.dir, which is configured inbroker.conforfilesystem_offload_core_site.xml.managedLedgerNameis the ledger name of the persistentTopic manager.
managedLedgerName of persistent://public/default/topics-name is public/default/persistent/topics-name.You can use the following method to get
managedLedgerName:String managedLedgerName = TopicName.get("persistent://public/default/topics-name").getPersistenceNamingEncoding();
To read data out as ledger entries from the filesystem, complete the following steps.
- Create a reader to read both
MapFilewith a new path and theconfigurationof the filesystem.
MapFile.Reader reader = new MapFile.Reader(new Path(dataFilePath), configuration);
- Read the data as
LedgerEntryfrom the filesystem.
  LongWritable key = new LongWritable();
  BytesWritable value = new BytesWritable();
  key.set(nextExpectedId - 1);
  reader.seek(key);
  reader.next(key, value);
  int length = value.getLength();
  long entryId = key.get();
  ByteBuf buf = PooledByteBufAllocator.DEFAULT.buffer(length, length);
  buf.writeBytes(value.copyBytes());
  LedgerEntryImpl ledgerEntry = LedgerEntryImpl.create(ledgerId, entryId, length, buf);
- Deserialize the
LedgerEntrytoMessage.
     ByteBuf metadataAndPayload = ledgerEntry.getDataBuffer();
     long totalSize = metadataAndPayload.readableBytes();
     BrokerEntryMetadata brokerEntryMetadata = Commands.peekBrokerEntryMetadataIfExist(metadataAndPayload);
     MessageMetadata metadata = Commands.parseMessageMetadata(metadataAndPayload);

     Map<String, String> properties = new TreeMap();
     properties.put("X-Pulsar-batch-size", String.valueOf(totalSize
             - metadata.getSerializedSize()));
     properties.put("TOTAL-CHUNKS", Integer.toString(metadata.getNumChunksFromMsg()));
     properties.put("CHUNK-ID", Integer.toString(metadata.getChunkId()));

     // Decode if needed
     CompressionCodec codec = CompressionCodecProvider.getCompressionCodec(metadata.getCompression());
     ByteBuf uncompressedPayload = codec.decode(metadataAndPayload, metadata.getUncompressedSize());
     // Copy into a heap buffer for output stream compatibility
     ByteBuf data = PulsarByteBufAllocator.DEFAULT.heapBuffer(uncompressedPayload.readableBytes(),
             uncompressedPayload.readableBytes());
     data.writeBytes(uncompressedPayload);
     uncompressedPayload.release();

     MessageImpl message = new MessageImpl(topic, ((PositionImpl)ledgerEntry.getPosition()).toString(), properties,
             data, Schema.BYTES, metadata);
     message.setBrokerEntryMetadata(brokerEntryMetadata);